Contact Us

Use the form on the right to contact us.

You can edit the text in this area, and change where the contact form on the right submits to, by entering edit mode using the modes on the bottom right. 

9204581898

Relish is a unique cook's store in the heart of downtown Sheboygan, WI.

Find everything for the home chef, including the finest in cookware, cutlery, bakeware, utensils and gadgets galore. Independently owned and operated, we treat our customers like family and strive to provide the best selection and service anyone could need. Visit Relish to find innovative and reliable cookware and kitchen supplies from great national and local brands, discover fun and unique gifts for the cook in your life, and get inspired in one of our educational and entertaining cooking classes. 

Recipe Archive V

Grilled Chicken Sandwiches

Lia Soneson

 
ChixSandwiches_v2_01.jpg

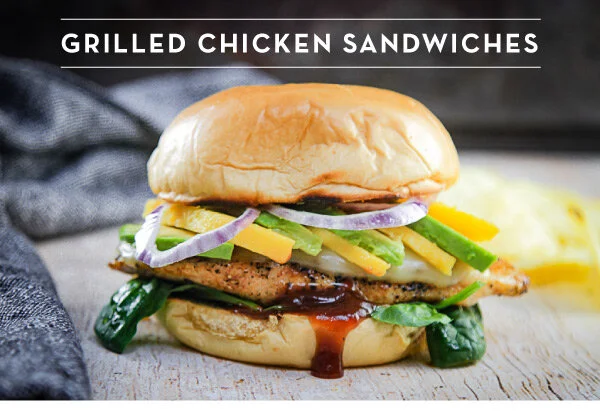
Enjoy a fully loaded grilled chicken sandwich! Perfectly grilled, juicy chicken is layered with elements of sweet, salty, tangy, and savory that will delight the senses. You won't believe how easily it comes together!

Grilled Chicken Sandwiches
Serves 4

Chicken and the Rub:
2 boneless chicken breasts, sliced in half
2 tablespoons olive oil
1/2 teaspoon Kosher salt
1/2 teaspoon fresh ground pepper
1/2 teaspoon ground cumin
1/4 teaspoon garlic powder
1/4 teaspoon paprika
1 teaspoon sugar

Sandwich Ingredients:
4 buns
4 tablespoons butter for buns
4 slices pepper jack cheese
1 avocado, sliced
1 ripe mango, sliced
4 ounces spinach
1/4 red onion, thinly sliced
BBQ sauce

Directions:
1. In a large bowl drizzle the chicken with the olive oil, and then rub with the spices (Kosher salt, pepper, cumin, garlic powder, paprika, and sugar) until well-coated on all sides. Preheat the grill.

2. Butter the buns on the inside of both the top and bottom, and prepare to grill by placing on a plate or platter to take out to the grill. Place the cheese on the side of the same plate, too.

3. Prepare the toppings for the sandwich. Halve, de-seed, peel, and slice the mango. Halve, pit, peel, and slice the avocado. Wash and spin dry the spinach leaves; remove stems as needed. Thinly slice the red onion.

4. Grill the chicken breast for 4-5 minutes and flip with grill tongs or metal spatula. Once the chicken breasts are almost done, place the cheese on top of each chicken breast, and allow the cheese to melt. Remove from the grill once the thickest part of the breast reaches 165 degrees F. Let the grilled breasts rest on a clean platter while grilling the buns.

5. Toast the buns on the grill until just golden brown.

6. Layer the toasted bun with a smear of BBQ Sauce, then add a layer of spinach leaves. Place the grilled chicken breast with melted cheese on top of the spinach. Add slices of avocado and mango, and top with slices of red onion. Drizzle more BBQ sauce on top. Finish the sandwich by capping it all with the top grilled bun. Enjoy!


Fiesta Chop Salad

Lia Soneson

 
FiestaChop2021_v3_01.jpg

This Fiesta Chop Salad is packed with goodies! Start with the fresh crunch of chilly iceberg lettuce, then add cheese, chili beans, red onions, tomatoes, grilled corn, AND corn chips! The creamy, tangy cilantro dressing ties it all together. Enjoy all the fresh, delicious flavors – your taste buds will be doing a happy dance!

Fiesta Chop Salad
Serves 6 - 8

Creamy Cilantro Dressing:
(makes about 1 cup of dressing)
1/4 cup white wine vinegar
1 tablespoon fresh lime juice
1/4 cup olive oil
1/2 cup plain Greek yogurt
2 teaspoons sugar
1/2 teaspoon dried cumin
1/2 teaspoon garlic powder
1/2 teaspoon dried oregano
1/4 teaspoon paprika
1/4 teaspoon Kosher salt
1/4 teaspoon black pepper
2 tablespoons fresh cilantro, minced

Salad Ingredients:
1 head chopped iceberg lettuce
10 oz grape tomatoes, halved
1 can (14 oz) chili beans, slightly drained
4 ears corn, grilled and kernels cut off the cob
Olive oil for brushing corn cobs
1/4 red onion, finely diced
3 cups grated sharp cheddar cheese
2 cups corn chips (like Fritos)

Directions:
1. Make the dressing. Prepare the cilantro by finely mincing for the dressing. Whisk together the vinegar, lime juice, olive oil, Greek yogurt and sugar together in a small jar until well combined. Add the spices and cilantro, and whisk or shake until emulsified.

2. Prep the veggies. Over direct heat, grill the corn (turning as needed) until char marks appear. About 15-20 minutes. Once the grilled corn has cooled slightly, carefully cut the kernels off from the cob with a sharp knife, or a corn stripping tool.

3. Meanwhile, wash and chop the lettuce. Finely dice the red onion and halve the grape tomatoes.

4. Assemble the salad. Toss all of the salad ingredients together with the dressing and then top the salad with the corn chips. Toss once more to incorporate the chips. Serve immediately!


French Toast Sticks

Lia Soneson

 
French-Toast-Sticks_v2_01.jpg

This week we are channeling our inner child with French toast sticks! The extra surface area achieved when preparing French toast sticks brings twice the flavor while enrobing wonderfully custardy insides. Their handy shape means they are destined for easy dipping, serving, and sharing with the whole family. Good Morning!

Cinnamon-Sugar French Toast Sticks
Serves 4

Ingredients:
1 large loaf bread (such as a brioche or Italian loaf that’s 3-4 days old)
3 eggs
3/4 cup heavy cream
1 teaspoon vanilla
1/4 teaspoon salt
1/2 teaspoon allspice
1/2 cup white sugar
1 tablespoon cinnamon
4 tablespoons salted butter, divided

For Serving:
Pure Maple syrup
Seasonal berries

Directions:
1. Trim the crust off of the bread and slice it into equally-sized strips, roughly 1" thick.

2. In a medium bowl, whisk together the eggs, cream, vanilla, salt, and allspice. Pour the mixture in a shallow bowl. In a small bowl, mix together the sugar and cinnamon. Spread the mixture out on a medium-sized plate.

3. Melt 2 tablespoons butter in a medium-large skillet.

4. Separate the bread sticks into two even batches. Starting with the first batch, dredge the bread sticks one at a time in the egg mixture by rolling them for a few seconds to evenly coat the bread all the way around. Shake off any excess egg mixture.

5. Place a few of the sticks of bread into the skillet, spacing them evenly, with about 1" in between (this spacing will make them easy to grab and turn). Cook the French toast sticks over medium-low heat using tongs to turn. Cook evenly until all sides are golden brown (roughly 1-2 minutes on each side).

6. Immediately remove the sticks from the pan and coat with the cinnamon and sugar while the French toast sticks are still hot, repeating until all of the sticks from the first batch are coated.

7. Melt the remaining 2 tablespoons of butter and repeat Steps 4-6 with the remaining sticks.

8. Once all the French toast sticks have been cooked and coated, serve immediately with warm maple syrup and fresh seasonal berries.


Wilted Spinach Salad

Lia Soneson

 
Wilted-Spinach-Salad_V2_01.jpg

It's time to enjoy spring greens! Learn how to make the perfect soft-boiled egg and maximize your salad making skills with our take on a classic wilted spinach salad. Jammy eggs, crispy bacon, and wilted spinach come together with creamy goat cheese, crunchy breadcrumbs, and a tangy, fresh, warm dressing. Delicious!

Wilted Spinach Salad with a Perfect Soft-Boiled Egg
Makes 4 salads

Ingredients:
For the Breadcrumbs:

2 tablespoons butter
1 cup hearty (and slightly stale) bread, pulsed into breadcrumbs
1/4 teaspoon Kosher salt
1/4 teaspoon black pepper

For the Salad:
1/2 lb. bacon, fried and crumbled
4 eggs, soft-boiled and halved
2 lbs. fresh spinach or baby spinach
1/2 small shallot, thinly sliced
4 oz. goat cheese, crumbled into bite-sized pieces

For the Warm Bacon Dressing:
2 tablespoons reserved bacon fat
2 tablespoons olive oil
2 tablespoons apple cider vinegar
1 tablespoon fresh lemon juice
2 teaspoons Dijon mustard
1 teaspoon honey
1/4 teaspoon Kosher salt
1/4 teaspoon black pepper

Directions:
1. Prepare the Breadcrumbs: Making your own breadcrumbs is a snap! Toss a few slices of stale bread in a food processor and pulse into a fine texture. Spread the crumbs in a single layer on a sheet pan and and pop into a 300 degree oven for 10 minutes or until lightly toasted. (Watch carefully.) Once cooled, they're ready to use on salads or casseroles.

2. In a large skillet, melt the butter and toss with the breadcrumbs. Over medium heat, stir the breadcrumbs often and toast until golden brown. Season with Kosher salt and pepper. Remove from the pan and set aside.

3. Prepare the Bacon: In the same skillet, fry the bacon until crispy. Remove the bacon, and let cool on a paper towel-lined plate. Crumble. Reserve 2 tablespoons of the bacon grease for the dressing.

4. Prepare the Dressing: In a small saucepan, combine the rendered bacon fat with the olive oil, vinegar, lemon juice, Dijon mustard, honey, salt, and pepper. Heat the dressing until just warmed.

5. Prepare the Soft-boiled Eggs: Bring a saucepan filled halfway with water to boil. Add the eggs and boil for exactly six minutes. Remove immediately from the boiling water and cool slightly by running under cold water for about a minute. Peel and halve the eggs. Soft boiled eggs may be made ahead of time and kept in their shells and in the fridge for up to two days. To reheat, drop the pre-cooked eggs into boiling water for three minutes. Cool slightly, peel, and serve!

6. Assemble and Serve the Salad: Just before the eggs finish boiling, toss the spinach with the bacon crumbles, shallot, and the warm bacon dressing. Toss with tongs until the spinach begins to wilt slightly. Plate each dish with a serving of wilted spinach, one soft-boiled egg cut in half, a few crumbles of goat cheese, and a generous sprinkle of toasted breadcrumbs. Serve immediately and enjoy!


Pea Pesto Pasta

Lia Soneson

 
Pea_Pesto_v2_01a.jpg

A good pasta dish can transform everyday ingredients into something extraordinary any day of the week. Springtime flavors inspire this fresh take on pasta. We think your family will love this super-quick, spring pea pesto pasta dish. Buon appetito!

Spring Pea Pesto Pasta
Serves 4

Spring Pea Pesto Ingredients:
1/2 cup frozen peas
1/4 cup Parmesan cheese
1/2 teaspoon Kosher salt
1/4 teaspoon freshly ground black pepper
1/4 teaspoon crushed red pepper flakes
1/2 cup olive oil
1/2 cup packed fresh basil leaves
1 tablespoon packed fresh mint leaves
juice of 1/2 lemon (about 2 tablespoons)
1 small clove fresh garlic

Pasta:
1 lb thin spaghetti

Garnish:
1 pint Sun Gold tomatoes, halved
8 oz burrata cheese
Mint leaves, chiffonade
Basil leaves, chiffonade
Lemon zest

Directions:
1. Gather all of the pesto ingredients together. Be sure to thoroughly wash all of the fresh herbs! Pulse the pesto ingredients together in a food processor. Taste test the pesto, and adjust the salt and pepper accordingly. If needed, add more olive oil for a thinner consistency. Enjoy pesto immediately, or keep covered and refrigerated (or even frozen) until ready to use.

2. Slice the tomatoes in half with a small paring knife. Roll the basil and mint leaves and cut in a chiffonade cut for a garnish.

3. Cook the pasta according to the package instructions. Drain, reserve about 1 cup of the pasta cooking water. For better pasta, salt the water! The cooking water should be “like the sea” – start with about 1 teaspoon coarse kosher salt per quart of water. This seems like a lot of salt, and it is, but most of this will be discarded when the pasta is drained. Test the pasta frequently as it approaches completion. Pasta should be cooked to al dente – “to the tooth” – tender, yet chewy, not at all mushy. The easiest way to check for doneness, is to remove a piece of pasta and test between your teeth. Or, cut a piece of test pasta, and check the cross section view. The smallest white dot, or white line at the center of the pasta piece indicates doneness is nearly at hand.

4. Mix the pesto with the drained and cooked pasta, stir with tongs until the pasta is well-coated with the pesto. Add reserved pasta water, to thin the sauce, if needed. 5. Garnish the pasta with the tomato halves, pieces of fresh burrata, mint, and basil leaves. Enjoy!


Spring Panzanella

Lia Soneson

 
Spring-Panz_V3_01.jpg

Is it spring yet? Bring it on with our snappy and colorful Spring Panzanella Salad! You’ll find it a satisfying dinner, or a delightful side salad. This healthy salad is packed with spring veggies like roasted asparagus, crunchy snap peas, and super-thin, sliced radishes. Further, this salad experience is elevated with homemade seasoned croutons, creamy goat cheese, a fresh tangy dressing, and tasty garnishes.

Spring Panzanella
Makes 2 large entrée salads, or 4 side salads

Crouton Ingredients:
2-3 cups cubed of rustic loaf of bread, cut into 1-1/2” cubes
2 tablespoons butter
2 tablespoons olive oil
1 teaspoon dried Herbes de Provence seasoning
1/4 teaspoon Kosher salt
1/4 teaspoon pepper

Salad Ingredients:
3-4 cups baby arugula
1 cup snap peas, sliced on the big angle
1/2 bunch asparagus, sliced into 1 inch pieces (tossed with olive oil, Kosher salt, pepper) 4 oz goat cheese, bite sized pieces
4 radishes, thinly sliced with mandoline

Vinaigrette Ingredients:
1/4 cup olive oil
1 tablespoon white wine vinegar
2 tablespoons fresh lemon juice (zest, and then juice)
1 teaspoon Dijon mustard
1/2 teaspoon Kosher salt
1/4 teaspoon fresh ground pepper
1 teaspoon Herbes de Provence
1 teaspoon shallot, minced
1 teaspoon honey

Garnish Ingredients:
lemon zest of 1 lemon
10 mint leaves, cut into a chiffonade

Directions:
1. Preheat the oven to 425 degrees F. Slice the asparagus into 1” pieces. Toss with one tablespoon of olive oil and salt and pepper. Roast the asparagus in a single layer on a baking sheet for 5 minutes, or until just crisp tender.

2. Prepare the cubed bread into semi-soft croutons. Melt the butter in a large skillet and mix with the olive oil. Toss the cubed bread in the skillet until evenly coated. Sprinkle with the Herbs de Provence, kosher salt, and pepper. Stir the croutons while heating until they are lightly toasted on all sides.

3. Meanwhile, prepare the snap peas by washing and cutting on a dramatic angle to reveal the peas inside.

4. Prepare the radishes by washing and cutting thin slices with a mandoline. Take care! Mandolines are super sharp, amazing tools that should be respected. We recommend to gear up for safety and use a protective glove AND the hand guard. The thin slices are so worth it!

5. In a small bowl or jar, whisk together all of the vinaigrette ingredients until emulsified.

6. Mix the salad together in a large bowl. Toss the arugula, sliced radishes, and asparagus with the dressing until coated.

7. Carefully layer in the snap peas and croutons. Top with bite-sized pieces of goat cheese and garnish with lemon zest and fresh mint.


Classic Potato and Leek Gratin

Lia Soneson

 
Potato-Leek-Gratin_V3_01.jpg

In this classic dish, thinly sliced potatoes are layered with a distinctive Mornay sauce. Mornay sauce is a Béchamel sauce with the addition of Gruyère cheese. The additions of savory leeks, garlic, and rosemary combine in a wonderful way in the sauce to infuse flavor into every bite. This recipe is a warm, comforting side dish, or hearty enough for the main event!

Classic Potato & Leek Gratin
Serves 6 - 8

Ingredients:
2 lbs Idaho potatoes (about 7-8 potatoes), washed, peeled, and thinly sliced with a mandoline
5 tablespoons butter, divided
3 small leeks, green parts removed, finely sliced
1 tablespoon rosemary, minced
4 cloves garlic, minced
1/4 cup all-purpose flour
3 cups whole milk
2 teaspoons kosher salt
1/4 teaspoon black pepper
1-1/2 cup grated Gruyère, plus
2 tablespoons reserved as topping

Directions:
1. Preheat the oven to 400°F.

2. Prep the potatoes. Use a sharp peeler to peel the potatoes. Rinse off, and then slice into 1/8” slices using a handheld mandoline.

3. In a large saucepan, melt 1 tablespoon butter and cook the leeks over medium heat until they are translucent, about 10 minutes. Add the rosemary and garlic and cook for about another 3 minutes.

4. Prepare the roux. In a separate, small saucepan, heat the remaining 4 tablespoons of butter. Once the butter has melted, whisk in the flour until the mixture is completely smooth. Continue cooking for about 1-2 minutes. This process removes the raw flour flavor and helps create a silky sauce.

5. Create a Béchamel sauce by very slowly pouring milk into the roux, continue whisking the mixture until the sauce is smooth. Add in the salt and pepper and continue whisking over medium-low heat for 3-5 minutes until the sauce thickens and becomes very creamy.

6. Transform the sauce into a Mornay sauce by slowly adding in the Gruyère cheese. Continue cooking and whisking for a few more minutes until the sauce is smooth, and the cheese is well incorporated. Add the cooked leeks mixture to the sauce.

7. Layer the gratin. Butter the bottom and sides of a large baking dish and lay a single layer of potatoes. Pour some of the sauce over the potatoes and continue to layer the potatoes, pouring more sauce at each layer. Repeat this step until all of the potatoes are used (or you get to within 1/2” from the top of your dish).

8. Coat the final layer of potatoes with sauce and sprinkle with the reserved cheese.

9. Cover the gratin with a tight fitting lid or foil and bake for 60 minutes. Remove the lid or foil, and continue to bake for another 10 minutes, or until the top turns golden brown.

10. Garnish with additional fresh pieces of rosemary, and serve hot.


Deep Dish Pizza

Lia Soneson

 
DeepDishZa_v2_01.jpg

Who doesn’t love pizza??? Tonight it’s deep dish pizza on the menu! This deep dish version of pizza is inspired by a few unique pizza places that feature a partial cheese crust. Inside, delicious layers of flavor are assembled into some sort of pizza heaven. Fresh dough is topped with a layer of cheese, red onions, a robust red sauce, and finally, a hearty serving of spicy sausage - one slice is nearly enough!

Deep Dish Pizza - Sausage & Red Onion with a Crispy, Caramelized, Cheesy Crust
Makes two 12-inch deep dish pizzas - Serves 8

Dough Ingredients:
3/4 cup warm water
2-1/4 teaspoons (or one packet) yeast
1 tablespoon sugar
1 teaspoon kosher salt
2 tablespoons olive oil
2 tablespoons butter, melted
2-1/2 cups all-purpose flour

Pizza Toppings:
1 lb low-moisture mozzarella cheese, sliced in 1/8"-thick slices
8 ounces parmesan cheese, shredded
1 pound sausage, roughly rolled into 1" bite-sized discs
1/2 red onion, thinly sliced

Sauce Ingredients:
2 cloves garlic, minced
2 tablespoon olive oil
1 (28 oz) can petite diced tomatoes
1 (14oz) can crushed tomatoes
1 (6 oz) can tomato paste
2 teaspoons dried basil
2 teaspoons dried oregano
1 teaspoon dried marjoram
1/4 teaspoon fresh ground pepper
1 teaspoon Kosher salt
1 tablespoon sugar

Directions:
1. Prepare the pizza dough by hand or by using a stand mixer. Pour the warm water into a large bowl, and add the yeast. Stir slowly for about two minutes, then add the sugar, salt, olive oil, and melted butter and stir again until combined. Add 1 cup of flour, and stir until combined. Slowly add the remaining 1-1/2 cup of flour until a dough ball has formed. Knead the dough several times until a smooth ball has developed. Cover the dough with a damp cloth and let the dough rise in a warm location for about 1-1/2 hours.

2. Meanwhile, prepare the sauce. Sauté the garlic with the olive oil, stirring until fragrant. Be sure to watch this step carefully so that the garlic doesn't burn! Once the garlic is fragrant, add the diced tomatoes, crushed tomatoes, tomato paste, basil, oregano, marjoram, pepper, salt, and sugar. Bring the sauce to a low simmer and cook stirring as needed for 40-45 minutes or until the sauce has thickened nicely.

3. Use two well-seasoned 12" cast iron pans or deep dish pizza pans. Cover the surface with a generous layer of canola oil on the bottom and sides. Press the dough into the cast iron as a single flat layer and let the dough rise for an additional 30 minutes in the pan. (You can freeze half the ingredients for later.)

4. Preheat the oven to 500 degrees F.

5. Once the dough has risen in the pan, it's time to assemble the pizza. Make a layer of folded mozzarella slices all along the edge of the pan creating a "cheese crust" and then continue to layer on top of the layer of dough. Add the shredded parmesan on top of the mozzarella.

6. Spread the sliced red onions around the pizza on top of the cheese layers.

7. Add a hefty layer of pizza sauce to the pizza covering the onions completely.

8. Finally, top with pizza with the sausage discs.

9. Line a large baking sheet with aluminum foil to place on the oven rack directly below the pizza to catch any drips as the pizza cooks. Turn on a ventilation fan, and perhaps even crack a window. Any cheese that spills over will make a bit of a smoke.

10. Tent a loose piece of aluminum foil over the pizza. Bake for 20 minutes.

11. Check to make sure that the drip pan is correctly aligned to catch any spillage and continue baking for an additional 20-25 minutes or until the pizza crust is well set, the sausage is cooked, and the sauce and cheese below are bubbling hot. The sides of the crust that are made of cheese might look blackened, but they should not taste burnt, instead they will taste of delightful caramelized cheese and help to hold all of the ingredients in place.

12. Let the pizza cool slightly, enough to slide it from the pan onto a parchment paper-lined cutting board. Cut the pizza into slices with a sharp cook's knife working from the cheesy edge into the middle.

13. Pace yourself when enjoying - one pizza is hearty! One 12-inch pizza serves 4 hungry adults.


Scallops with Lemon Pasta

Lia Soneson

 
Scallops_v2_01.jpg

A classic romantic dinner for two, scallops and pasta make a great “date-night in”! Scallops are often referred to as the 'candy of the sea' — and for good reason! When cooked correctly, these beautiful morsels have the most delicate, sweet flavor. This issue showcases how to properly select and cook scallops — a presentation featuring a caramelized crust on the outside and a slightly-sweet, buttery-soft inside. Served on a bed of lemon-enhanced angel hair pasta, this meal is just as filling as it is fancy. 

Sugar-Seared Scallops with Lemon Pasta
Makes 2 generous servings

Sugar-Seared Scallop Ingredients:
10 sea scallops
1/4 teaspoon Kosher salt
1/4 teaspoon black pepper
2 tablespoons butter
2 tablespoons sugar
1 cup dry white wine

Lemon Pasta Ingredients:
1/2 lb angel hair pasta
5 tablespoons butter
5 cloves garlic, thinly sliced
1/2 teaspoon crushed red pepper flake
1-1/2 cup vegetable stock
1 tablespoon fresh lemon juice
1/2 tablespoon lemon zest
2 tablespoons fresh parsley, chopped
1/2 cup shredded parmesan
1/4 teaspoon salt
1/4 teaspoon pepper

Directions:
This is a great recipe to make with two chefs working together for a romantic meal! The first chef can focus on the pasta and sauce, while the second can sugar-sear the scallops. With both chefs working simultaneously, this dinner comes together quickly! 

CHEF ONE PREPARE THE PASTA:
1. Prepare the pasta sauce by melting the butter over medium heat. Add the garlic and cook for 1 minute until fragrant. Add the crushed red pepper and cook for another minute. Add the vegetable stock, lemon juice, and lemon zest, and cook for 5 minutes to allow the flavors to get friendly. 

2. Meanwhile, prepare the pasta by bringing a large pot of water to a rolling boil. Add a healthy dose of salt and add the pasta, cooking until al dente, about 2-3 minutes. Strain the pasta from the water and set aside until the scallops have seared.

CHEF TWO PREPARE THE SCALLOPS:
3. While Chef One makes the pasta, Chef Two can prepare the scallops. Gently rinse the scallops and pat dry with a paper towel. Gently remove the side muscle that secures the scallop to the shell, if necessary. Sprinkle the scallops with salt and pepper. Prepare a plate with a layer of sugar.

4. Sear the scallops. Heat the butter in a skillet on medium-high. While the butter heats, coat both sides of each scallop in sugar. Once the skillet is hot, work in two batches to cook the scallops. Place the scallops sugar-side down on the skillet, spacing them at least 1 inch apart, making sure not to crowd the pan. The scallops should sizzle on contact with the pan. If they start to brown too quickly, reduce the heat. Use tongs to gently flip and cook scallops for 2-3 more minutes. Scallops should release easily from the pan when they are ready to be turned. Remove the first batch of scallops from the pan and cook the second batch, reserving the pan juices. Deglaze the pan by adding the wine, and continue to cook the scallop juices and wine for another minute. Remove from the heat and set aside. 

WORK TOGETHER TO PLATE THE DINNER:
5. Just as the scallops finish searing, have Chef One stir the cooked pasta into the sauce. Use tongs to make sure the sauce fully coats the pasta. Sprinkle with parsley and parmesan and toss. 

6. Artfully plate the pasta and have Chef Two add the seared scallops on top. Drizzle the seared scallops with any remaining scallop pan juices. Sprinkle with additional salt and pepper and serve immediately. Enjoy!


Classic Minestrone Soup

Lia Soneson

 
Minestrone_v2_01.jpg

Minestrone, a classic Italian soup, features a wide range of  vegetables, beans, and pasta. Our recipe version focuses on techniques for building great flavor in stages. The result? Deep, rich, satisfying tastes and textures without being over-cooked. You’ll find this soup highly flexible – use seasonal vegetables, or whatever you have on hand.  We think you’ll agree that this minestrone easily earns its reputation as a healthy, winter comfort food.

Comforting Minestrone Soup
Serves 4 - 6

Ingredients:
4 tablespoons olive oil
1 yellow onion, diced
3 celery stalks, dice
2 carrots, cut on the bias into slices
2 small potatoes, cut into 1/2" cubes
3 cloves garlic, minced
1/2 tablespoon tomato paste
2 bay leaves
1 Parmesan cheese rind
1 can (28 oz) diced tomatoes
6 cups vegetable broth
1 can (15.5 oz) Great Northern beans
1 can (15.5 oz) butter beans
1 cup ditalini pasta (or other small pasta)
1/2 teaspoon Kosher salt
1/2 teaspoon pepper
2 sprigs fresh thyme
1/4 teaspoon red pepper flakes
1 tablespoon red wine vinegar
1 cup frozen peas
3 cups chopped kale
Parmesan cheese, shaved, for serving

Directions:
1. Start by making the mirepoix. Heat the olive oil in a large Dutch oven over medium-high heat. Add the onions and sauté for about 3 minutes until softened. Add the celery and carrots, and continue to cook for another 3-5 minutes, or until softened.

2. Add the potatoes and garlic and continue to cook for another 5 minutes. Stir in the tomato paste.

3. Add the bay leaves, Parmesan rind, canned tomatoes, vegetable broth, Great Northern and butter beans, ditalini pasta, salt, pepper, thyme, and red pepper flakes. Bring to a boil over medium-high heat.

4. Reduce the heat to medium-low and simmer the soup for another 20-25 minutes. Use tongs to remove the Parmesan rind, bay leaves, and thyme stems.

5. Stir in the red wine vinegar, frozen peas, and chopped kale. Cook for one more minute, or until the kale just begins to wilt. Serve with shaved Parmesan cheese as a garnish on top.


Winter Bowls

Lia Soneson

 
WinterBowl2021_v2_01.jpg

The season for healthier dinners has arrived! Each January inspires a renewed energy and recommitment to healthier habits. Winter grain bowls are a delicious way to achieve those goals! This tasty bowl features baked tofu with quinoa, roasted beets, and arugula all dressed with a flavorful turmeric tahini dressing.

Winter Grain Power Bowls
Makes 4 large bowls

Winter Grain Bowl Ingredients:
1 block extra firm tofu
1 large purple beet (or two small beets), peeled & diced into 1/2" cubes
1 large golden beet (or two small beets), peeled & diced into 1/2" cubes
1 fennel bulb, stalks removed, cored, and thinly shaved
3 tablespoons olive oil, divided
1/2 teaspoon salt, divided
1/4 teaspoon pepper, divided
1 cup quinoa
2 cups vegetable stock
1 tablespoon cornstarch
1 red onion, thinly sliced with a mandoline
1 large carrot, shaved and rolled
4 cups arugula
1/3 cup shelled pistachios
Fresh mint leaves, torn for garnish

Turmeric Tahini Dressing Ingredients:
3 tablespoons olive oil
1/4 cup tahini
1 teaspoon fresh ginger, minced
2 tablespoons fresh lemon juice (about 1 large lemon)
2 tablespoons water (as needed, to thin)
1/4 teaspoon of kosher salt
1/4 teaspoon cayenne pepper
1/2 teaspoon turmeric
1 clove garlic, minced

Directions:
1. Prepare the tofu by slicing it into 1" thick slices. Lay the slices on a paper towel-lined baking sheet, then cover the tofu with another layer of paper towels. Place a cutting board on top of the covered slices to press out the excess water from the tofu. (Place a cookbook or a heavy pot on top of the cutting board to help apply weight and pressure so that extra water is forced out of the tofu. This pressing and draining step will help the tofu achieve a better texture when baking.) Press and drain the tofu slices for about 20-30 minutes.

2. Preheat the oven to 400°F. In two separate bowls, prepare the beets and fennel. Toss the diced beets with 1 tablespoon olive oil, 1/8 teaspoon salt, and 1/8 teaspoon pepper. Toss the shaved fennel with 1 tablespoon olive oil, 1/8 teaspoon salt, and 1/8 teaspoon pepper. Place the prepared beets and fennel in a large roasting pan and roast for 15 minutes or until the fennel starts to turn golden brown. Remove the fennel and continue roasting the beets for another 15 minutes, or until the beets are fork tender.

3. Meanwhile, prepare the quinoa on the stovetop using a 2:1 liquid-to-grain ratio. Bring the vegetable stock to a boil and add the quinoa. Stir, cover, and turn down the heat to low. Check after 15 minutes to see if the quinoa is tender, or if more liquid is needed to finish cooking. The small kernels expand as they soak up the cooking liquid. When tender and ready, you’ll see a tiny curlicue emerge; this is the beginning of a quinoa sprout, (and a sign of doneness.) Remove from the heat when done.

4. After the tofu has drained, remove the weights and paper towels and cut the tofu slices into 1" cubes. Gently toss the tofu cubes with 1 tablespoon olive oil, 1/4 teaspoon salt, and 1 tablespoon cornstarch until evenly coated. Spread the tofu cubes across a lined baking sheet and bake in the oven at 400°F for 30 minutes. Half way through baking, turn the tofu pieces. Bake until the tofu is baked and crisped on all sides.

5. Prepare the turmeric tahini dressing by whisking all of ingredients together until the dressing is combined.

6. Thinly slice the red onion using a mandoline. Shave the carrot into ribbons using a vegetable peeler. Tear the mint leaves for a garnish.

7. Once all of the ingredients are prepared, assemble the bowls. Add a scoop of cooked quinoa to each bowl, then add the roasted beets, roasted fennel, and baked tofu. Continue building the bowl by adding a few slices of red onion, a few ribbons of carrot, and a handful of arugula. Drizzle the bowl with the dressing and then garnish with pistachios and fresh mint leaves.


Shrimp Cocktail & Gin Martinis

Lia Soneson


Even if you’re having a solo party this New Year’s Eve, you still deserve to celebrate the fact that 2020 is almost behind us -- and what a year it has been! IN THIS ISSUE we welcome 2021 with perfectly poached shrimp cocktails and ice cold gin martinis. Bottoms up . . . and ONWARD!

Classic Shrimp Cocktail and Gin Martinis

Shrimp Ingredients: (Serves 4)
24 large, 21-25 count deveined shrimp (keep tail intact)
2 lemons, 1 juiced and 1 cut into wedges
1 small onion, cut into wedges
3 cloves garlic, smashed
1 stalk celery cut into large pieces
2 bay leaves
1 teaspoon Kosher salt
1 teaspoon sugar
1 teaspoon peppercorns

For Garnishing:
Several sprigs of Italian parsley
1 lemon, cut into wedges

Homemade Cocktail Sauce Ingredients:
3/4 cup ketchup
2 tablespoons prepared horseradish
1/4 teaspoon salt
1/2 teaspoon Worcestershire sauce
1 teaspoon lemon juice
1/2 teaspoon Tabasco sauce (optional)
1/4 teaspoon celery salt

Classic Gin Martini:
(Serves 1) 3 oz. gin (chilled in the freezer)
1/2 oz. dry vermouth (chilled in the refrigerator

Garnish:
3 pimento-stuffed olives or lemon twist

Shrimp Cocktail Directions:
1. Combine lemon wedges, lemon juice, onion, garlic, celery, and bay leaves in a large pot filled 3/4 full with water. Bring the water to a boil and add the salt, sugar, and peppercorns. Once the water comes to a rolling boil, remove the pot from heat. Add the shrimp to the hot water and cover with a lid. Let the shrimp cook in the hot water for 5-8 minutes until shrimp are pink and opaque. 

2. While the shrimp are poaching, fill a large bowl with ice and water. Once shrimp are cooked, remove from the hot water by straining in a colander; discard the remaining contents. Plunge the shrimp into the ice and water and let them chill completely. Drain and serve immediately, or chill in the refrigerator for up to 12 hours.

3. While the shrimp are chilling, make the cocktail sauce by combining the cocktail sauce ingredients in a small bowl or wide-mouthed glass.

4. Serve the shrimp in glasses for individual servings, or on a large platter for serving a small group. Garnish with fresh lemon wedges and sprigs of parsley leaves.

Classic Gin Martini Directions:
1. Place martini glasses in the freezer to chill.

2. Meanwhile, combine gin and vermouth in a mixing glass full of ice. Stir for 30 seconds.

3. Strain into a chilled martini or coupe glass and garnish with olives or a lemon twist. Enjoy immediately!


Green Chile & Cheese Egg Bake Bites

Lia Soneson


Holiday preparations are in full swing, and that means busier mornings and weekends. We find ourselves searching for protein-packed recipes that come together in a snap. These featured savory egg bake bites are just that! IN THIS ISSUE we share our favorite recipe for petite-sized breakfast bites, along with tips on how to crack an egg one-handed.

Green Chile & Cheese Egg Bake Bites
Makes 12 egg bites

Busy mornings are the norm! We often find ourselves searching for satisfying, protein-packed recipes that come together in a snap to help us approach the day with some solid nourishment. You’ll find that these savory egg bake bites are just that -- delicious, satisfying, and easy!

Ingredients:
1/2 cup butter, melted, plus 2 tablespoons softened
1/4 cup flour
1/2 teaspoon baking powder
1/4 teaspoon Kosher salt
1/2 teaspoon pepper
1/2 teaspoon paprika
8 eggs
3/4 cup small curd cottage cheese
7 oz can chopped green chiles
2 cups grated Monterey Jack cheese (about 8 oz)

Directions:
1. Preheat the oven to 350°F. Generously butter the cups of a standard-sized mun pan with the softened butter.

2. In a medium bowl, mix together the flour, baking powder, salt, pepper, and paprika.

3. In a large bowl, whisk the eggs. Slowly add the dry ingredients to the egg mixture and whisk to combine.

4. Stir in the melted butter, cottage cheese, green chiles, and Monterey Jack cheese and continue stirring until the ingredients are incorporated.

5. Use a measuring cup to evenly distribute the egg mix into the 12 prepared cups of the mun pan.

6. Bake until set, about 20-25 min. Let the egg bake bites cool in the pan before removing. Eat while warm or store in the refrigerator for 3 days in an air-tight container, or wrap well and store in the freezer for up to two months.


Coq au Vin

Lia Soneson


Coq au Vin or "rooster in wine" is a traditional French peasant stew that became popular thanks to Julia Child's encouragement. While the original recipe might turn a tough old rooster into something delicious,  it's equally delightful with chicken thighs and or legs. Red wine, mushrooms, bacon, onions, and thyme all infuse wonderful flavors into this ultimate comfort food dish. A slow braising technique coaxes a mélange of easy ingredients into a dance of gustatory perfection!

Coq au Vin - Chicken in Wine
Serves 4 - 6

Ingredients:
1/2 lb bacon, diced
4 drumsticks, skin on and bone-in
4 chicken thighs, skin on and bone-in
1/2 teaspoon Kosher salt
1/2 teaspoon fresh ground pepper
2 tablespoons olive oil 1 onion, diced
2 cloves garlic, minced
4-5 large carrots, cut into 1-inch diagonal pieces
3 tablespoons flour
2 tablespoons tomato paste
1 tablespoon brandy
2 cups red wine (a good red wine like a pinot noir)
1 cup chicken broth
8-10 sprigs of fresh thyme
2 tablespoons butter
1/2 lb frozen small pearl onions
8 oz cremini mushrooms, sliced
Chopped parsley, for garnish

Directions:
1. Preheat the oven to 325 degrees F.

2. Prepare the onions, garlic, and carrots.

3. In a large Dutch oven fry the bacon until crisp. Remove the bacon, and drain on a paper towel-lined plate.

4. Remove most of the bacon fat, leaving about 3-4 tablespoons in the Dutch oven.

5. Sprinkle the chicken pieces with Kosher salt and pepper. Sear the chicken legs and thighs on all sides in the Dutch oven until the skin is a crispy golden brown, then remove the chicken pieces.

6. Add 2 tablespoons of olive oil to the pot and sauté the diced onions until softened and translucent.

7. Add the garlic and carrots to the onion and sauté for a few more minutes until the garlic is fragrant.

8. Dust the vegetables with 3 tablespoons of flour and stir until coated. Cook for about 2 minutes.

9. Add the tomato paste and cook until fragrant, then add the brandy to the mixture. Cook the brandy down for a minute, then continue to deglaze the pan with the red wine. Add the chicken broth and stir until combined. Add the seared chicken pieces back to the pot with the cooked bacon, and the sprigs of thyme.

10. Cover the pot and place in the oven. Bake for 20-40 minutes or until the chicken is tender and cooked to 165 degrees F.

11. While the chicken is baking, prepare the mashed potatoes.

12. While the chicken bakes, prepare the pearl onions. In a skillet, sauté the pearl onions in two tablespoons butter until they are lightly golden brown on all sides.

13. Then, sauté the mushrooms in the same skillet, adding olive oil as needed, and cook until browned.

14. Add the cooked pearl onions and mushrooms to the Dutch oven. Carefully taste and season with additional salt and pepper, as needed. If needed, continue to simmer on the stovetop to thicken the sauce. The sauce will also thicken more as it cools.

15. Serve the Coq au Vin on a bed of mashed potatoes (or egg noodles or cauliflower rice), and garnish with fresh parsley.


Salted Caramels

Lia Soneson

 
Caramels_2020_v2_01.jpg

Everyone loves the captivating flavors of fresh homemade caramels! 

The little known secret? They are deceptively easy to make. Fresh, homemade caramels make great treats for sharing as little gifts in the holiday weeks ahead. IN THIS ISSUE, we show you, step-by-step, how to  master boutique caramels made in your own kitchen.

Handcrafted Caramels
Makes about 120 - 140 pieces, depending on size

Ingredients:
Vegetable oil (for coating pan)
3 cups heavy cream
3 cups granulated white sugar
1 cup brown sugar, packed
2 cups light corn syrup
1-1/2 teaspoons Kosher salt
1/2 cup (1 stick) unsalted butter
2 teaspoons vanilla extract

Directions:
1. Prepare a 9 x 13 rimmed pan prior to starting to cook. Oil the bottom and sides of the pan well using a tasteless vegetable oil, one that stays liquid at room temperature. Line the pan with a criss-cross of parchment paper cut to match the pan’s size with a little extra at the ends; avoid any wrinkles in the corners. Set aside. 

2. Wipe the interior of a large saucepan or Dutch oven with a light coating of oil. Measure the heavy cream, sugars, light corn syrup and salt into the pan. Over medium-low heat, stir the ingredients together until well-combined and the sugar is dissolved.

3. Increase the heat to medium. Continue stirring until the cream-sugar mixture reaches a boil. Stop stirring. Using a brush dipped in warm water, wash down any sugar crystals that may have formed on the edge of the pan. Allow the mixture to cook, without stirring, until it reaches the firm-ball stage, around 248°F as measured on a candy thermometer clamped to the side of the pan. (If you do not have a candy thermometer, use a water test to check for the appropriate sugar stage. A drop (approximately 1/4 teaspoon) of caramel in cold water should form a firm ball, yet be pliable.)

4. Remove the caramel from heat, add the butter and vanilla stirring until melted and well-combined with the cream-sugar mixture. (Cutting the butter into half-inch cubes will help to efficiently melt and distribute this key ingredient.)

5. Carefully pour the caramel into the prepared, lined pan. Allow the caramel to set and cool to room temperature. This will take several hours or overnight. (For evenly sized caramels, make sure the pan is setting on a level surface.)

6. Once cooled, lift the sheet of caramel from the pan to a safe cutting surface. The caramel should retain its shape. Neaten the edges of the caramel to remove the rounded edges. Cut the caramel slab vertically and horizontally in desired sizes and shapes with a long-bladed cook’s knife. We suggest 1-1/4-inch by 1/2-inch pieces, or 1-inch squares. Wrap the pieces in nonstick wrap such as parchment paper. Store at cool room temperatures for up to 2-3 weeks.


Wine Poached Pears

Lia Soneson


When we want to embrace the beauty of the season, we turn to wine poached pears. THIS ISSUE features poached pears, served alongside vanilla bourbon mascarpone whipped cream. The subtle sweetness of this dish is exactly what we need to offset any holiday sugar highs, and nothing looks more striking.

Wine Poached Pears with Bourbon Mascarpone Whipped Cream
Makes about 4 poached pears

When we want to embrace the beauty of the season, we turn to wine poached pears. This recipe features poached pears, served alongside vanilla bourbon mascarpone whipped cream. The subtle sweetness of this dish is exactly what we need to offset any holiday sugar highs, and nothing looks more striking.

Ingredients:
4 Bosch pears, peeled with stem in-tact
1 bottle of dry red wine (750ml)
1 cup water
1/4 cup sugar
3 sticks of cinnamon
1/4 teaspoon cardamom
1 vanilla bean pod, halved and seeds scraped

Bourbon Mascarpone Whipped Cream Ingredients:
4 oz Mascarpone cheese
1/4 cup powdered sugar
1 cup cold heavy whipping cream
1 tablespoon bourbon
1/2 teaspoon vanilla extract

Directions:
1. Peel the pears, carefully leaving the stems in place. 

2. Combine the red wine, water, sugar, cinnamon, cardamom, and vanilla bean seeds in a sauce pan and bring to a simmer. Stir until the sugar dissolves. Add the peeled pears making sure they are covered in the liquid. Simmer for about 40 minutes, or until the pears are tender and red, then chill the pears. Cook the wine mixture down into a sauce by simmering for an additional 45 minutes - 1 hour, or until your desired sauce consistency is reached.

3. Attach a chilled mixing bowl to a stand mixer with a whisk attachment. Add the mascarpone cheese and sugar and mix together on high until fully combined, about 3 minutes. Add the cream, bourbon, and vanilla extract, and mix ingredients together, starting on low speed, then increasing to a high speed, whipping until soft peaks form, roughly 8 minutes.

4. Serve immediately alongside the chilled pears, drizzle with the reduced wine sauce, and sprinkle with cinnamon.


Chocolate Orange Holiday Cookies

Lia Soneson


Chocolate Orange Cookies - Slice & Bake Makes about 24 cookies

Ingredients:
1 cup unsalted butter, softened
1/2 cup light brown sugar, packed
1-1/4 cups granulated sugar
1 large egg, room temperature
1 teaspoon pure almond extract
1 teaspoon freshly squeezed orange juice
2-1/4 cups all purpose flour
1/4 teaspoon salt
1/4 teaspoon cardamom
1 tablespoon orange zest (about 1 medium orange)
4 oz dark chocolate chunks, finely chopped, plus 16 oz dark chocolate chunks for melting
Coarse sugar for rolling, (such as sugar in the raw)
Flake sea salt
Additional orange zest for sprinkling

Directions:
1. In a stand mixer with a paddle attachment, beat the butter on medium speed until smooth. Add the sugars and beat on medium until light and fluffy. Add the egg and almond extract and beat on high speed until the ingredients are fully combined, roughly 5 minutes. Scrape down the sides and the bottom of the bowl with a spatula as needed. Add the orange juice and continue mixing for another minute.

2. Sift the flour in a separate bowl and mix in the salt and cardamom. Slowly add the dry ingredients to the wet ingredients 1/2 cup at a time, mixing on low speed until fully incorporated. Fold in the orange zest and the 4 oz of finely chopped chocolate until evenly distributed. Gather and remove the dough from the mixer.

3. On a floured surface, divide the dough in half. Roll each half into a log, about 2-1/2 inches in diameter, and wrap in plastic wrap. Completely chill the dough (for at least 2 hrs, or for up to 1 week).

4. When ready to bake, preheat the oven to 350°F. Remove one of the dough logs from the refrigerator. Roll the logs in the coarse sugar and use a sharp, serrated knife to slice the log into individual rounds, roughly 1/2" thick. Place the cookies on a large cookie sheet, roughly 2" apart and bake for 12 minutes, or until the edges of cookies are just starting to brown. Cool on the cookie sheet for 2 minutes, then transfer to a cooling rack.

5. While the cookies are cooling, melt 16 oz of chocolate in a double boiler or in the microwave (careful not to burn the chocolate if microwaving!). Dip each cookie halfway into the chocolate to coat one half, and place the half-coated cookie on a parchment paper, or a silicone-lined baking sheet. While the chocolate is still warm, sprinkle the cookies with the flake salt and orange zest. Place the baking sheet in the refrigerator for about 30 minutes to allow the chocolate set. Store the cookies in the refrigerator to ensure the chocolate stays set.


Cranberry Salsa Crostini

Lia Soneson


Looking for a fast and festive appetizer? This Cranberry Salsa Crostini is just the answer! It's delicious and a cinch to assemble. It takes advantage of an often stereotyped, seasonal fruit and presents it in a new way. Try this during Thanksgiving week, and maybe a few more times throughout the upcoming holiday season.

Cranberry Salsa Crostini
Makes 2.5 cups of salsa

Salsa Ingredients:
1 bag (12oz) fresh cranberries
2 jalapeños, seeded and coarsely sliced
4-6 scallions, green and white parts, sliced (about 1/2 cup)
1/4 cup cilantro, roughly chopped, packed
1 tablespoon lime juice, freshly squeezed
1/4 teaspoon Kosher salt
3/4 cup sugar, more to taste, as desired
1/4 teaspoon cumin

Homemade Crostini:
Slice a baguette into 1/4” slices, brush each slice with olive oil on both sides and bake (turning once) at 375°F until golden brown - about 5-7 minutes per side.

To Serve:
16 oz. cream cheese (two pkgs.)

Salsa Directions:
1. Rinse the fresh cranberries in a colander. Pick out any bruised or withered berries. Towel dry the cranberries and place into the work bowl of a food processor.

2. Cut off the stem end of the jalapeño peppers, halve, remove the seeds, and any rib membranes. Coarsely chop the peppers and add to the cranberries. Prep the scallions by washing and trimming away the root end. Roughly slice the scallions including about 6 inches of the onion’s green portion. Add the scallions to the food processor.

3. Rinse the cilantro well and pat dry. Remove any coarse stems of the cilantro, but it’s perfectly fine to include the tender portion of the stems in this salsa. (Not having to stem the cilantro will save a lot of time!) Add the cilantro to the food processor.

4. Add the remaining ingredients: lime juice, salt, sugar, and cumin.

5. Pulse the mixture in the food processor stopping occasionally to scrape down the sides. Chop until all of the ingredients are finely chopped, but not pureed.

6. Transfer the mixture to a bowl for refrigerator storage. Chill for at least one hour. As the salsa chills, the sugar will promote the release of the cranberries’ juices. It will turn a lovely deep red – a dazzling color for any holiday table all season long. Stays fresh for up to 3 days -- a great do-ahead dish!


Chocolate Chip Pumpkin Cake with Brown Butter Cream Cheese Frosting

Lia Soneson


Biting into this cake signifies all of the things we love about the changing seasons. Warm notes of fall spices pleasantly mix with sweet chocolate and rich brown butter frosting. In this recipe, we highlight pumpkin in a cake that can be served both after dinner or alongside your morning coffee.

Chocolate Chip Pumpkin Cake with Brown Butter Cream Cheese Frosting
Makes 12 pieces

Biting into this cake signifies all of the things we love about the changing seasons. Warm notes of fall spices pleasantly mix with sweet chocolate and rich brown butter frosting. This recipe highlights pumpkin in a cake that can be served both after dinner or alongside your morning coffee.

Ingredients:
4 eggs
1/2 cup white sugar
1 cup light brown sugar, packed
1 cup vegetable oil
1 can (15 oz) pumpkin puree
2 cups all purpose flour
2 teaspoons baking powder
1 teaspoon baking soda
1-1/2 teaspoons ground cinnamon
1/4 teaspoon ground nutmeg
1/4 teaspoon ground ginger
1/4 teaspoon ground clove
1 teaspoon ground allspice
1/2 teaspoon Kosher salt
1-1/4 cup dark chocolate chips

Brown Butter Frosting Ingredients:
1/2 cup butter
8 oz cream cheese, softened
1 teaspoon vanilla
3 cups confectioners’ sugar
1/4 teaspoon cinnamon for sprinkling

Directions:
1. Preheat the oven to 350°F.

2. In a stand mixer on medium-low speed, mix the eggs, white sugar, brown sugar, oil and pumpkin puree until incorporated. In a separate bowl, sift together the flour, baking powder, baking soda, cinnamon, nutmeg, ginger, clove, allspice, and salt.

3. Slowly add the flour mixture to the pumpkin mixture and continue to mix until combined. Fold in the chocolate chips.

4. Pour the batter into a 10” x 10” ungreased baking dish. Bake for 40-45 minutes or until a toothpick comes out clean. If the top or edges brown before the rest of the cake has baked, tent aluminum foil over the top. Cool on a cooling rack.

5. Make the frosting: Melt the butter in a small saucepan. Continue cooking over medium heat, stirring often, until the butter turns a light golden brown, about 5 minutes. Be careful not to burn the butter! Remove from heat and let the butter cool. In a stand mixer, mix together the cream cheese and the browned butter until fluffy. Add the vanilla and mix. Gradually add the confectioners’, sugar continuing to mix until smooth.

6. Once the cake has completely cooled, generously spread the frosting over the top of the cake in a thick layer. Dust with cinnamon and enjoy!


Creamy Butternut Squash Pasta

Lia Soneson


Fall flavors unite in a most delightful way in this creamy, dreamy pasta!

IN THIS ISSUE, butternut squash is transformed into a tasty sauce. The naturally sweet sauce is balanced with spicy sausage, then generously topped with savory cheese and crispy sage leaves. It’s a wonderful kind of deliciousness!

Creamy Butternut Squash Pasta with Sausage and Crispy Sage 
Serves 8 - 10 

Fall flavors unite in a most delightful way in this creamy, dreamy pasta! Butternut squash is transformed into a tasty sauce. The naturally sweet sauce is balanced with spicy sausage, then generously topped with savory cheese and crispy sage leaves. It’s a wonderful kind of deliciousness! 

Ingredients: 
1 medium butternut squash, peeled, cut in half, seeds removed 
4 tablespoons butter 
20-25 fresh sage leaves
1 lb hot Italian ground sausage 
2 tablespoons olive oil 
1 large shallot, finely diced 
2 cloves garlic, minced
1/2 cup white wine 
1 cup heavy whipping cream 
1 teaspoon Kosher salt 
1/2 teaspoon black pepper 
2 lbs pasta, ziti or another tube pasta 

Garnish: 
crispy sage leaves parmesan cheese, shaved or grated

Directions: 
1. Prep the butternut squash: Wash the squash well, cut both ends o the squash to create a flat surface. Peel the squash with a peeler. Slice in half length-wise and scoop out the seeds. 

2. Using a large pasta pot with a steamer basket, steam the butternut squash until it is fork tender, about 30-35 minutes. 

3. Remove the squash and purée with a blender or immersion blender until it is smooth. 

4. Meanwhile, in a large Dutch oven, sauté the sausage into bite-sized chunks until nicely browned. Remove the sausage from the pot. Set aside. Reserve the pot and drippings for the shallots, garlic, and the next steps in sauce making. 

5. Next, in a nonstick skillet, prepare the crispy sage leaves. Melt the butter, then sizzle the sage leaves on each side until just crisp. Place the leaves on a paper towel-lined plate to cool. Reserve the sage butter to sauté the shallot and garlic, and for adding to the sauce. 

6. Using the Dutch oven, add any remaining butter from the sage. Sauté the shallot and garlic until translucent. Add additional olive oil to sauté, as needed. 

7. Once the aromatics are softened, add 1/2 cup of white wine and simmer until the wine is reduced by half. 

8. Add the blended squash to the aromatics and stir until combined. Stir in the heavy cream. Gently simmer the sauce until the pasta is ready. Season with salt and pepper, to taste. 

9. Meanwhile, cook the pasta until al dente, reserve at least 1 cup of the pasta water, then drain well. 

10. Add the pasta to the sauce. Add up to 1 cup of reserved pasta water until the sauce reaches a silky consistency. 

11. Add the sausage to the pasta. Dish the pasta, and garnish with a hearty portion of freshly shaved or grated parmesan cheese. Top each serving with several crispy sage leaves.