Contact Us

Use the form on the right to contact us.

You can edit the text in this area, and change where the contact form on the right submits to, by entering edit mode using the modes on the bottom right. 

9204581898

Relish is a unique cook's store in the heart of downtown Sheboygan, WI.

Find everything for the home chef, including the finest in cookware, cutlery, bakeware, utensils and gadgets galore. Independently owned and operated, we treat our customers like family and strive to provide the best selection and service anyone could need. Visit Relish to find innovative and reliable cookware and kitchen supplies from great national and local brands, discover fun and unique gifts for the cook in your life, and get inspired in one of our educational and entertaining cooking classes. 

Recipe Archive V

Classic Cheese Ravioli with Brown Butter, Lemon, and Caper Sauce

Lia Soneson

Homemade pasta is always such a treat! This delicious cheese ravioli recipe is elevated by this simple, yet divine, brown butter, lemon, and caper sauce. Break out the pasta machine! Let's get dinner rolling!


Classic Cheese Ravioli with Brown Butter, Lemon, and Caper Sauce
Makes 36 ravioli, or Serves about 4

Basic Pasta Dough Ingredients:

3 eggs
1-1/2 cups all-purpose flour
1/2 cup semolina flour
1/2 teaspoon salt

Classic Cheese Filling Ingredients:

2 tablespoons extra olive oil
1/2 onion, diced and sautéed
2 cloves garlic, minced and sautéed
1/4 cup parmesan cheese, finely grated
3/4 cup ricotta cheese
1/2 teaspoon dried basil
1/2 teaspoon dried oregano
1 tablespoon fresh parsley, minced
1/4 teaspoon Kosher salt
1/4 teaspoon freshly ground black pepper

Brown Butter, Lemon and Caper Sauce Ingredients:

8 tablespoons (1 stick) butter
1/8 cup fresh lemon juice
1/4 cup capers, drained
parsley, for garnish
parmesan cheese, finely grated for garnish

Directions:

Mix the Pasta Dough:

1. In a food processor, mix the eggs with the all-purpose flour, semolina, and salt. Pulse until a loose dough ball begins to form. Remove the dough from the food processor and knead a few times by hand.

2. Let the ball of pasta dough set in a covered bowl, or in plastic wrap for 15 minutes to promote relaxation of the glutens. (The dough may be left to rest longer, up to 30 minutes). As it rests, it will become increasingly softer and easier to roll into the required thin sheets.

Prep the Filling:

3. In a large sauté pan, sauté the onion until translucent. Add the garlic and sauté for an additional 30 seconds. The mix will be nicely fragrant. Remove from the heat and let cool.

4. In a large bowl, mix the sautéed onions and garlic with the remaining filling ingredients (parmesan cheese, ricotta cheese, basil, oregano, parsley, salt, and pepper). Set aside until ready for assembly.

Assemble the Ravioli:

5. Divide the pasta dough into two portions with a dough cutter or large knife. Dust the working surface, and flatten one portion of the dough into a disc.

6. Using a pasta machine or pasta making attachment, set the rollers to the widest setting. While cranking, feed the disc of dough through the rollers. Continue cranking evenly until the entire portion has been rolled out. Dust each side of the rolled pasta dough with a small amount of flour. Reduce the width of the rollers to the next thinner setting. Feed the dough through the rollers again. Repeat the narrowing of the rollers and the rolling of the dough until the dough is about 1/8” in thickness (a number 5 or 6 on an Atlas Marcato Pasta maker). Once the dough sheet reaches this thin stage, cut the sheet in half to make two equal pieces.

7. Place one of the rolled pasta sheets on top of a ravioli maker ensuring that the dough placement is aligned well. Press the dough lightly into each well of the ravioli maker.

8. Place a tablespoon-sized scoop of filling into each pocket. Lightly wet the edges of each ravioli section with a wet fingertip. This will help to seal the ravioli effectively in the next step.

9. Top the tray with the second half sheet of pasta covering the filling. Place the top of the ravioli maker on top. Using a rolling pin, roll over the tray to seal the ravioli together.

10. Carefully remove the ravioli from the tray. With a fluted pastry cutter or ravioli cutter, cut between the pockets of filling to form the individual ravioli.

11. Freeze the ravioli in a single layer on a parchment-covered baking sheet for 30 minutes. This will assist in easier handling during cooking. Once frozen, the ravioli may also be packaged in airtight wrapping and stored in the freezer for up to two weeks.

Cook the Ravioli:

12. Bring 4 quarts of water to a boil in a large pot. Generously salt the water with Kosher salt.

13. Place the ravioli carefully into the boiling water in small batches of 8-12 in order to avoid crowding during cooking.

14. Once the ravioli begin to float, check a corner of a ravioli for doneness.

15. Using a slotted spoon, or a spider tool, remove the boiled ravioli and place in a warm bowl.

Make the Sauce:

16. Melt the butter in a skillet and cook until just golden brown. Add the lemon juice and capers, and stir.

17. Spoon the browned butter sauce over the cooked ravioli and garnish heartily with more freshly minced parsley and finely grated parmesan cheese. Serve and enjoy!

Weeknight Chicken Parmesan

Lia Soneson

To us, Chicken Parmesan is the definition of comfort food! With a hearty red sauce, bubbly cheese, and perfectly breaded, tender chicken cutlets served over a plate of pasta, what's not to love? Our recipe includes a few shortcuts making this delicious dish very doable even on a weeknight! We think you'll love it!


Weeknight Chicken Parmesan
Serves 4

Ingredients:

4 pieces of thinly-sliced chicken breast
2 eggs
1/2 cup Italian breadcrumbs
1/4 cup grated Parmesan cheese
1/8 cup olive oil for pan-frying chicken
4 tablespoons butter, for pan-frying chicken
1 jar of your favorite marinara sauce
8 slices provolone cheese

Directions:

1. Prepare the chicken. Whisk the eggs in a shallow bowl. Mix the breadcrumbs and grated Parmesan cheese in a separate, shallow bowl. Dip each chicken breast first into the eggs, then into the breadcrumb mixture. Spoon the breadcrumbs on top of the chicken until well-coated on both sides. Set aside on a plate until ready to pan-fry.

2. In an oven-safe skillet or braiser, add 1/8 cup of olive oil to the pan, and 1 tablespoon of butter under each chickenbreast. Cook the chicken over medium heat until browned and crispy on both sides. Turn the heat down slightly, and continue cooking the chicken until the internal temperature reaches 165 degrees F. Depending on the size of the pan, work in batches so that the chicken has plenty of room to cook without touching any other piece. This will help to keep the breading intact and to cook evenly.

3. Once all the chicken has cooked, add the 4 pieces back into the skillet. Spoon yourfavorite jarred marinara sauce over each cooked piece of chicken. Add 2 slices of provolone cheese on top of each sauced chicken breast.

4. Broil until the cheese is bubbling and just beginning to brown.

5. Serve the chicken on a bed of thin spaghetti with a little extra warmed sauce, or with a crisp, green, side salad.

Acai Smoothie Bowls

Lia Soneson

Smoothie bowls are a fun, colorful, and healthy option for breakfast! We love this easy recipe featuring vibrant acaí (ah-sigh-EE) berries. Simply blend all of the ingredients together until smooth. Have fun placing delicious garnishes on top in a beautiful way. Breakfast is served!


Acai Smoothie Bowls
Serves 2

Ingredients:

7 ounces frozen açai berry packets (substitute 1 cup of frozen mango or berries if not using acai packets)
1/2 frozen banana
1/2 cup blueberries (fresh or frozen)
1 cup fresh spinach leaves
1 tablespoon ground flax seed
1/2 cup oat milk (or a milk of your choice)

Garnishes:

fresh banana slices
blueberrie
sshaved coconut
chia seeds

Directions:

1. BLEND the frozen açaí berry packets with the banana, blueberries, spinach leaves, ground flax seed, and oat milk until smooth. Use the blender tamper when blending to help move the ingredients around.

2. POUR the smoothie into two bowls and top with an array of garnishes. We chose to garnish ours with banana slices, blueberries, shaved coconut, and chia seeds. Get creative with garnishes and arrange your choice of toppings with care for an artful and delicious experience!

3. Enjoy!

Swedish Meatballs with Sour Cream Sauce

Lia Soneson

These flavorful meatballs make a festive appetizer that are just the right size! You’ll find that these mini-meatballs are packed with flavor and may be enjoyed in one bite. The savory sauce makes them even better! Serve with cocktail picks and appetizer plates. Start the party!


Swedish Meatballs with Sour Cream Sauce
Makes 60-70 1-inch mini-meatballs

Ingredients:

1 small onion, finely diced
1 tablespoon olive oil
1 lb. ground beef (96% lean)
1 lb. ground pork
1 cup Panko breadcrumbs
1/2 cup beef broth
1 tablespoon parsley, minced
3 cloves garlic, crushed
2 eggs
1/4 teaspoon ground allspice
1/2 teaspoon Kosher salt
1/2 teaspoon black pepper
Olive oil for the baking pan

Sour Cream Sauce Ingredients:

2 tablespoons butter
2 tablespoons flour
1 cup beef broth
1/2 cup sour cream
Salt and pepper, to taste
1 tablespoon minced parsley (for garnishing)

Directions:

1. In a small skillet, sauté the finely diced onions in olive oil until translucent, about 5 minutes. Cool slightly.

2. Mix the onions with the beef, pork, breadcrumbs, broth, parsley, garlic, eggs, and spices.

3. Make the meatballs. With a small scoop or spoon, form small balls about 1-inch in diameter. Place on one or two lightly oiled parchment-lined rimmed baking sheets.

4. Bake the meatballs in a 400 degrees F oven for 14-16 minutes or until cooked through, and the internal temperature reaches 160 degrees F.

Do-Ahead Tip: Bake the meatballs a day ahead of time, then refrigerate the meatballs, OR bake and freeze for up to a month. Reheat the meatballs in the oven before serving.

5. Make the Sauce: In a saucepan, cook the butter and flour roux for 2 minutes whiskingconstantly. Add the beef broth and continue to whisk until the sauce is smooth. Add the sour cream and whisk until well-combined. Season generously with salt and pepper.

7. Pour the sauce over the meatballs, toss to coat, and serve. Or, serve the sauce as a bed for the meatballs, or on the side. Garnish with minced parsley.

Beef Burgundy

Lia Soneson

Nothing comforts eager appetites quite like the rich, silky flavors of Beef Burgundy. Take the guesswork out of dinner and make one of our favorite “cozy” recipes. It will fill your home with wonderful aromas and please all the tummies around the table.


Beef Burgundy
Serves 6

Ingredients:

1/2 lb. thick-cut bacon, sliced into
1/2 inch pieces
1-1/2 to 2 pounds stew beef, cut into 1-inch cubes
1 large onion, diced
2 cloves garlic, minced
5 large carrots, sliced on a bias in 2-inch chunks
1/4 cup flour, salt and pepper for seasoning the beef
1 bottle of red wine, (minus a glass for the cook)
4 cups beef broth
2 tablespoons tomato paste
3 stems fresh rosemary
2 tablespoons butter
1/2 pounds crimini mushrooms, sliced

Directions:

1. Preheat the oven to 325 degrees F.

2. In a large Dutch oven cook the bacon pieces until crispy. Remove the bacon from the pot andlet drain on a paper towel-lined plate.

3. Leave 2-3 tablespoons of bacon fat in the pan for browning the stew beef. Add the stew beef to the hot pot. Salt and pepper the beef and brown on all sides. Work in batches, as needed, so that the meat is seared, not steamed.

4. Once the beef is browned on all sides, remove from the pot. Add the diced onions, and sauté until softened. Add the garlic and cook for two more minutes. Add the carrots, seared beef, and crispy bacon back into the pot. Add the flour and stir until everything is coated.

5. Add the red wine, broth, tomato paste, whole rosemary stems and cover. Roast in the low temperature oven for 2-1/2 hours.

6. Sauté the mushrooms in a skillet with butter until just browned. Keep warm. Add to the cooked dish before serving.

7. Serve the beef burgundy over a hearty scoop of mashed potatoes or buttered, egg noodles. Or, serve as a stew with a side of buttered French bread.

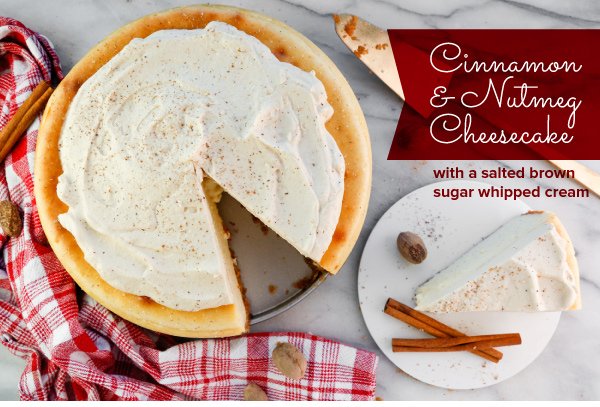
Cinnamon and Nutmeg Cheesecake with a Salted Brown Sugar Whipped Cream

Lia Soneson

We love this festive take on cheesecake! The warm, familiar spices of nutmeg and cinnamon make this classic, impressive dessert a little more holiday-forward. Topped with a wonderful, salted, brown sugar whipped cream, each bite feels like a truly spectacular indulgence.


Cinnamon and Nutmeg Cheesecake with a Salted Brown Sugar Whipped Cream
Makes one 9-inch cheesecake

Crust Ingredients:

1-1/2 cups graham cracker crumbs (about 12 full sheets of graham crackers)
2 tablespoons granulated sugar
1/2 teaspoon cinnamon
1/2 teaspoon Kosher salt
6 tablespoons unsalted butter, melted

Filling Ingredients:

4 (8 oz) packages cream cheese, softened
1-1/2 cups granulated sugar
4 large eggs, room temperature
1 cup sour cream
1-1/2 teaspoons vanilla extract
1/4 teaspoon Kosher salt
1-1/4 teaspoons freshly grated nutmeg, plus more for dusting
1/2 teaspoon cinnamon

Salted, Brown Sugar Whipped Cream Ingredients:

1/4 cup light brown sugar
1/2 teaspoon vanilla
1 cup heavy whipping cream
1/4 teaspoon Kosher salt

Directions:

2. Make the crust: Using a food processor, pulse the graham crackers into a fine crumb. Add the graham crackers, sugar, cinnamon, and salt to a small bowl and use a fork to incorporate. Add the melted butter and stir until all is coated

3. Wrap the outside of a 9-inch springform pan with heavy-duty aluminum foil. (This will create a protective barrier from the future water bath). Grease the inside of the pan. Pour the crumb mixture into the pan. Using a measuring cup or glass, press the crumbs evenly across the bottom and up the sides, making the crust as even as possible.

4. Bake the crust for 10 minutes, then cool completely on a wire rack.

5. Make the cheesecake filling: In a stand mixer fitted with the paddle attachment, add the softened cream cheese and the sugar and beat on medium/high speed until smooth. Scrape down the sides and the bottom halfway through to ensure

6. Add the eggs and beat on low until just combined. Add the sour cream, vanilla, salt, nutmeg, and cinnamon, and mix until combined, about 1 minute. Continue to scrape the sides and bottom of the bowl as needed.

7. Place the aluminum-wrapped springform pan into a larger baker or roasting pan. Pour the cheesecake filling into the par-baked pie crust and add hot water about 1-1/2" deep to the roasting pan. Very carefully place the pan on the bottom rack of the oven.

8. Bake for 60-75 minutes, checking the cheesecake about halfway through. It should be firm, yet jiggly. If it is not, continue baking until it is. Check every additional 5 minutes to ensure it does not overcook. Once this consistency is achieved, turn off the oven and let the cheesecake set in the warm oven for another hour. This allows the cheesecake to slowly cool as the oven cools. This slow cooling step will help prevent cracking.

9. Once the cheesecake has cooled in the oven, remove and let chill inthe refrigerator for 4-6 hours.

10. When ready to serve, combine the brown sugar, vanilla, heavy whipping cream, and salt in a stand mixer with the whisk attachment. Whisk until stiff peaks form, wiping down the sides with a spatula midway through. Do not over whip!

(11) Carefully run a knife around the perimeter of the cheesecake's crust to help it release from the sides. Release the springform ring. Top with the whipped cream, and a dusting of freshly ground nutmeg. Enjoy immediately!

Chocolate Cupcakes with Mint Buttercream and a Peppermint Chocolate Crunch

Lia Soneson

Cupcakes area always a hit, and this version will have you feeling festive immediately! Indulge with these delightfully rich, almost brownie-like, dark chocolate cupcakes topped with cool mint buttercream and sprinkled with peppermint flakes and crumbled mint cookies. Let's get baking!


Chocolate Cupcakes with Mint Buttercream and a Peppermint Chocolate Crunch
Makes 18 cupcakes

Chocolate Cupcake Ingredients:

12 tablespoons (1-1/2 sticks) butter, room temperature
1/2 cup dark chocolate chips
1/3 cup unsweetened cocoa powder
1-1/3 cups all-purpose flour
1 cup granulated sugar
1/2 cup packed light brown sugar
2 teaspoons baking powder
1/4 teaspoon salt
2 large eggs, room temperature
1/3 cup vegetable oil
1/2 teaspoon peppermint extract
1/2 cup whole milk
1/3 cup Greek yogurt

Mint Buttercream Ingredients:

1 cup (2 sticks) unsalted butter, room temperature
1/4 teaspoon peppermint extract
3-1/2 cups powdered sugar
2 tablespoons heavy cream
1/4 teaspoon salt
2 drops green food coloring (optional)

Top With:

2 tablespoons peppermint discs or candy canes, crushed
1/4 cup chocolate mint cookies, crushed
Fresh mint leaves

Directions:

1. Make the cupcakes. Preheat the oven to 350 degrees F. Lightly grease the top of a cupcake pan with a bit of vegetable oil. Place cupcake liners in three 6-count cupcake pans (for 18 cupcakes).

2. In a microwave safe bowl, melt the butter and chocolate chips in 30 second increments, stirring in between heating cycles, until melted and incorporated. Stir in the cocoa powder until well combined. Set aside.

3. In a large bowl, whisk the dry ingredients (flour, sugars, baking powder, and salt) until evenly combined with no visible lumps. Set aside.

4. In a stand mixer with the paddle attachment, add the remaining wet ingredients (eggs, vegetable oil, peppermint extract, whole milk, and Greek yogurt) to the chocolate mixture. Slowly mix to combine.

5. Slowly add the dry mixture to the wet ingredients, gently mixing until completely incorporated with no visible lumps. It should have a consistency similar to pudding.

6. Transfer the batterevenly to the prepared cupcake pans by using a cookie scoop or a large spoon.

7. Bake for 20-25 minutes, or until the cake springs back from a light touch, or when an inserted toothpick comes out cleanly.

8. Remove the cupcakes from the baking pan and place on a cooling rack to cool completely. While cupcakes cool, prepare the mint buttercream.

Mint Buttercream Directions:

1. Make the buttercream. Using a stand mixer fitted with the paddle attachment, beat the butter for 5 minutes until it turns pale yellow and has a smooth, silky consistency.

2. Add the peppermint extract and beat for an additional 30 seconds until well-combined.

3. Sift the powdered sugar once to remove any lumps. Add half of the powdered sugar to the creamed butter, and whip for 3-5 minutes until the icing looks fluffy. Then, add the remaining half of the sugar and mix for an additional 3-5 minutes or until fully incorporated with a whipped consistency.

4. Add the heavy cream, peppermint extract, and food coloring and whip until the the buttercream is smooth, the ingredients are incorporated, and the food coloring is consistent throughout -- a light green. Make sure to scrape down the sides of the bowl occasionally with a spatula to ensure all the ingredients are evenly mixed.

5. Using a frosting bag and a tip of your choice, ice the mint chocolate cupcakes. Top with the crushed peppermint candy and crumbled cookies. For a little extra pizazz, add a fresh mint leaf.

Roasted Brown Butter Squash with Nuts, Dates, and Crispy Herbs

Lia Soneson

This beautiful squash medley is a wonderful combination of creamy and caramelized textures, and savory and sweet flavors. A colorful mix of butternut, acorn, and delicata squash are sliced and roasted, then smothered in nutty, brown butter for a warming fall recipe. Topped with chewy dates, toasty nuts, and crispy herbs — prepare to devour this dish!


Roasted Brown Butter Squash with Nuts, Dates, and Crispy Herbs
Serves 6 - 8

Ingredients:

3 lbs acorn squash, delicata squash, butternut squash, or a mix of all three
4 tablespoons olive oil
1 teaspoon Kosher salt
1/2 teaspoon black pepper
8 tablespoons butter
3/4 cup walnuts, chopped
2 tablespoons pine nuts
6 Medjool dates, pitted and chopped
1/4 teaspoon cinnamon
1/2 teaspoon Aleppo pepper
2 tablespoons apple cider vinegar
1/4 cup fresh sage leaves, stems removed, washed and patted dry
1/4 cup fresh rosemary leaves, stems removed, washed and patted dry
Large flake salt (like Maldon)
1 cup grated Pecorino Romano

Directions:

1. Preheat the oven to 425 degrees F.

2. Scrub the squash well. If the butternut squash is young and small, the peel may be left on (the delicata and acorn squash rind may be left on). Otherwise, peel the butternut squash, slice all the squash in half and remove all seeds and loose pulp. Slice into 1/2" thick half moons. Place sliced squash on a rimmed baking sheet and drizzle with olive oil, and a sprinkling of salt and pepper. Toss to coat. Roast, turning once until the pieces are browned and caramelized, roughly 25-30 minutes.

3. Meanwhile, in a small saucepan over medium heat, melt the butter. When the butter starts to foam, add the walnuts, pine nuts, sage leaves, and rosemary. Stir constantly until the butter begins to brown, the herbs begin to crisp, and the nuts begin to toast, roughly 5 minutes. Keep a watchful eye. Remove the sage leaves with tongs and place them on a paper towel- lined plate. Watch the butter carefully to ensure it does not burn. Remove the pan from heat when the butter turns golden brown. (This will all happen very quickly, so pay attention.)

4. Remove the mixture from the heat, and stir in the chopped dates, cinnamon, Aleppo pepper, and apple cider vinegar.

5. Drizzle the mixture over the roasted squash and top with the crispy sage, flake salt, and grated Pecorino Romano.

6. Serve with a simple pasta, or over sturdy kale, or alongside roasted greens.

Chocolate, Pecan, and Pretzel Slab Pie with Vanilla Whipped Cream

Lia Soneson

A cross between a sheet cake and a traditional pie, this rich, chocolate, pecan, and pretzel slab pie checks all the boxes. Its size and “serve-ability” will appeal to the masses, while easy prep and minimal bake times appeal to the cook. Most importantly, the flavor profile is sweet, salty, c


Chocolate, Pecan, and Pretzel Slab Pie with Vanilla Whipped Cream
Makes one slab pie in a quarter sheet pan

Dark Chocolate Pie Crust Ingredients:

1-1/4 cups all-purpose flour
1/4 cup unsweetened cocoa powder
3 tablespoons granulated sugar
1/2 teaspoon Kosher salt
1/2 tablespoon espresso powder
8 tablespoons (1 stick) unsalted butter, cubed
4 tablespoons ice water

Chocolate Pecan Filling Ingredients:

4 large eggs
1/2 cup light corn syrup
1/2 cup maple syrup
1-1/2 cups packed brown sugar
1/2 cup butter, softened
1/2 tablespoon pure vanilla extract
1/4 teaspoon nutmeg
1/8 teaspoon cayenne
10 oz. semisweet chocolate baking chips
1 cup chopped pecan halves, plus some intact halves for the top of the pie
1/4 cup whole mini pretzels, for the top of the pie
1 teaspoon flake salt for sprinkling

Vanilla Whipped Cream Ingredients:

1-1/2 cups cold heavy whipping cream
1 teaspoon vanilla
1/4 cup powdered sugar

Directions:

1. Prepare the Crust. Grease the quarter sheet pan (9.5” x 13”). In a medium-sized bowl, place the flour, cocoa powder, sugar, salt, and espresso powder, and mix to combine. Add the butter cubes and use your hands to press the cubes with the flour to coat them. Gradually add the ice water and knead the dough until it just comes together into a shaggy dough ball. Press the dough into the base and into the edges of a quarter sheet pan until evenly distributed. Chill in the refrigerator for 30 minutes.

2. Preheat the oven to 350 degrees F. Bake the crust for 15-20 minutes, until the crust is cooked completely through, and the center is firm. Remove from the oven and set aside.

3. Prepare the Filling. In a stand mixer on medium speed, lightly beat the eggs. Add the corn syrup, brown sugar, butter, vanilla, nutmeg, and cayenne until incorporated. Fold in the chocolate chips and chopped pecans, then pour the filling into the baked crust. Top with pecan halves and mini pretzels in what ever pattern you desire. Press them into the filling lightly with the back of a spatula.

4. Bake for 30 minutes or until the top is brown, the sides start to bubble, and the inside is only slightly jiggly. Check halfway through and cover with aluminum foil tent if the top or edges are getting too brown. Sprinkle with flake salt and let cool completely on a wire rack.

5. Meanwhile, in a stand mixer with the whisk attachment, add the whipping cream and vanilla. Whip on high speed, slowly adding the sugar one tablespoon at a time. Continue to whip until soft peaks form. Do not over whip.

6. Serve the pie with a dollop of whipped cream. Sprinkle with more cocoa powder and flake salt as a garnish.

Savory Dutch Baby with Bacon and Caramelized Onions

Lia Soneson

This dish is a real crowd pleaser, mostly due to the high impact, wow-factor of the puffy, airy pancake. The savory toppings complement the egg-forward pancake for a delicious and filling breakfast. It’s a nice, new twist on a classic!


Savory Dutch Baby with Bacon and Caramelized Onions
Serves 4

Filling Ingredients:

3 slices bacon, cooked and sliced
1 tablespoon butter
1/2 medium, sweet onion, sliced pole-to-pole and caramelized
1/4 cup extra finely shredded parmesan cheese, plus a few more shredded tablespoons for garnish handful of arugula, washed

Pancake Ingredients:

4 eggs, room temperature
1 cup whole milk, room temperature 3/4 cup all purpose flour
1/4 teaspoon salt
a few grinds of black pepper
3 tablespoons butter

Directions:

1. On the stovetop, in a 10-inch cast iron skillet, cook the bacon until crispy, then set aside to cool on a paper towel-lined plate. Once the bacon has cooled, slice or tear into bite-sized pieces.

2. In the same skillet, remove all but 1 tablespoon of the bacon grease. Add the 1 tablespoon of butter. Cook the onion until caramelized and golden brown. Use low-and-slow heat to allow the onion to caramelize and not simply brown.

3. Preheat the oven to 450 degrees F. Wipe out the cast iron skillet and allow to warm further in the preheated oven until very hot, about 10 minutes.

4. Meanwhile, prepare the pancake batter. In a blender or food processor, mix the eggs, milk, flour, and salt together until the batter is smooth and free of any lumps.

5. Once the oven and pan have preheated, quickly melt the 3 tablespoons of butter inside the hot pan swirling to evenly coat the bottom and sides. Immediately pour the batter into the hot skillet. Quickly add the 1/4 cup of parmesan cheese to the center of the batter. Bake for 13-15 minutes or until the pancake is puffed and the edges are nicely golden brown.

6. Top the pancake with the cooked bacon, caramelized onions, a handful of fresh arugula, and additional finely shredded parmesan cheese. Enjoy immediately while hot!

Chickpea Soup with Lemon and Potatoes

Lia Soneson

This hearty soup combines earthy potatoes and creamy chickpeas for a deliciously flavorful dish. Brightened by citrus and enhanced with fresh parsley and Parmesan, the soup is thickened with a partial puree of itself. Pair it with slices of crusty bread with butter for an easy weeknight meal.


Chickpea Soup with Lemon and Potatoes
Serves 6 - 8

Soup Ingredients:

2 tablespoons unsalted butter
2 tablespoons olive oil
2 stalks celery, leafy tops removed, scrubbed, and finely chopped
1 small yellow onion, finely chopped
2 small carrots, scrubbed, peeled and finely chopped
3 cloves garlic, minced
1/4 teaspoon black pepper, plus more to taste
1/2 teaspoon Kosher salt, plus more to taste
1/2 teaspoon turmeric
1/4 teaspoon crushed red pepper flakes
6 cups vegetable stock
2 bay leaves
2 (15 oz) cans chickpeas, drained and rinsed
1.5 lbs small yellow potatoes, scrubbed and cut roughly into 1/2" pieces
1 lemon, zested and juiced Garnishes:
1/4 cup grated Parmesan
1/4 cup fresh parsley lemon slices

Directions:

1. In a large Dutch oven, heat the olive oil and butter over medium heat.

2. Make a mirepoix by sautéing the celery, onion, and carrot in the warm olive oil and butter until the carrot and celery are soft and the onions are translucent, roughly 5 minutes. Stir in the garlic, pepper, salt, turmeric, and crushed red pepper flake, and continue to sauté for another minute until the ingredients are incorporated and smelling fragrant.

3. Add the vegetable stock, bay leaves, chickpeas, and potatoes and bring ingredients to a boil. Once boiling, reduce the heat to low and simmer for 15-20 minutes, or until the potatoes are fork tender.

4. Use tongs to remove the bay leaves and discard. Very carefully ladle roughly half of the soup into a blender and purée until smooth. Return the pureed soup back into the Dutch oven and stir to create a creamy base, still with whole chickpeas and potato pieces throughout.

5. Stir in the lemon zest and one tablespoon lemon juice. Taste and add more lemon juice to your desired preference. Serve topped with a heaping pile of Parmesan and parsley, and a lemon slice, if desired. Add additional salt and pepper to taste.

Pork Ragu with Pappardelle

Lia Soneson

Hearty and savory, this pork ragu is packed with veggies, and is an easy solution to "what's for dinner?" An electric pressure cooker shortens the cooking time while still achieving succulent, pull-apart pork. With a few easy prep steps, you’ll find that this recipe over delivers on big flavor!


Pork Ragu with Pappardelle
Serves about 8

Ingredients:

4 carrots, roughly chopped, then minced in food processor
3 stalks celery, roughly chopped, then minced in food processor
1 onion, roughly chopped, then minced in food processor
3 cloves garlic, minced in food processor
1 (2-3 lb) boneless pork shoulder, cut into 3-4 smaller chunks, excess fat trimmed
Kosher salt and pepper for seasoning the pork
2 tablespoons vegetable oil
2 tablespoons olive oil
1 (28 oz) can tomato sauce
1 (6 oz) can tomato paste
1 cup red wine
1 tablespoon dried oregano
fresh rosemary, 2 sprigs
fresh thyme, 4 sprigs
2 bay leaves
1 pound pappardelle pasta
1/2 cup Parmigiano-Reggiano, shaved

Directions:

1. Roughly chop the onion, celery, carrot, and garlic until they fit into a food processor. Then, using the food processor, pulse the onion, celery, carrot, and garlic until finely minced (in just seconds)! Mince in batches, as needed.

2. Slice the pork shoulder into 4-5 smaller chunks. Season all sides generously with Kosher salt and pepper.

3. Using an electric pressure cooker on the brown function, add two tablespoons of vegetable oil and sear each side of the pork shoulder until just browned, then remove and set aside. Work in batches, as needed.

4. Add two tablespoons of olive oil to the pressure cooker and sauté the minced vegetables until fragrant and the onions have turned translucent. Stir the veggies and scrape up any browned bits from searing the pork into the vegetables. This fond will add a great depth of flavor to the final dish.

5. Add the tomato sauce, tomato paste, red wine, and oregano. Stir to combine.

6. Place the seared pork shoulder pieces around the sauce mixture, and top with the fresh herbs and bay leaves.

7. Seal the lid on the pressure cooker and bring to high pressure. Cook on high pressure for 45 minutes, then let the steam release naturally for 5-10 minutes. Remove the bay leaves.

8. Remove the cooked pork and shred with two forks discarding any excess fat. Return the shredded pork to the sauce. Stir the sauce to combine. Switch the cooker to a “keep warm” function until ready to serve.

9. Meanwhile, prepare the pappardelle pasta according to the package's instructions.

10. Serve the pork ragu over the cooked pappardelle and garnish with shaved Parmigiano-Reggiano cheese.

Butternut Squash Soup with Melted Brie and Honey Crostini

Lia Soneson

Creamy, savory butternut squash soup is an autumn favorite! Pair it with crostini topped with Brie, honey, and thyme to make a simple dinner something a little more special!


Butternut Squash Soup with Melted Brie and Honey Crostini
Serves 6 - 8

Soup Ingredients:

1 butternut squash
1 tablespoon olive oil
2 tablespoons butter
1 yellow onion, peeled and chopped
3 cloves garlic, minced
1 shallot, finely diced
1 large carrot, peeled and chopped
1 apple, peeled and chopped
2 stalks celery, chopped
1/2 teaspoon Kosher salt
1/4 teaspoon black pepper
1/8 ground nutmeg
1/8 teaspoon smoked paprika
1 teaspoon fresh rosemary, minced
Drizzle of heavy cream
6 cups vegetable broth

Crostini Ingredients:

1 baguette
1 tablespoon olive oil
8.8 oz Brie
1 tablespoon honey
1/2 tablespoon fresh thyme leaves

Directions:

1. Prep the butternut squash. Cut off the ends of the squash and across at the “waist.” Peel the skin with a knife or a vegetable peeler. Cut the base in half and scoop out the seeds. Slice and dice the squash into roughly 3/4" cubes.

2. In a large Dutch oven, add the olive oil and butter until the butter melts. Add the chopped onion, garlic, shallot, carrot, apple, and celery. Sauté for 5 minutes over medium heat, stirring frequently.

3. Add the cubed butternut squash and season it with salt, pepper, nutmeg, smoked paprika, and fresh rosemary. Stir to coat, then cover and cook for 15 minutes, stirring occasionally.

4. Add the vegetable stock, and bring the ingredients to a low boil over medium heat. Boil for 5 minutes. Reduce the heat to low, cover, and simmer for 15 minutes or until the butternut squash is fork tender.

5. While the soup is simmering, preheat the oven to 450 degrees F. Slice the baguette into slices and place on a rimmed baking sheet lined with parchment paper. Brush the slices with olive oil. Slice the Brie into 1/2" thick slices and place on the baguette slices. Bake for 5 minutes or until the bread begins to brown and get crispy. Remove from the oven and drizzle with the honey and sprinkle with the thyme leaves.

6. Using an immersion blender, purée the soup until smooth. Take care not to let the hot soup splatter. Ladle out servings, and top each bowl with a drizzle of heavy cream, and additional salt and pepper. Serve the prepared crostini onthe side.

Spicy Refrigerator Bread and Butter Pickles

Lia Soneson

Nothing quite compares to the fresh crunch of a homemade pickle! These sweet, tangy, bread-and-butter pickles need only one night in the refrigerator before they can be happily snacked upon. Add the crispy, green pickles to anything from hamburgers, to salads, or charcuterie boards.


Spicy Refrigerator Bread and Butter Pickles
Makes (3) 12-oz. jars

Pickle Ingredients and Supplies:

1-1/2 pounds pickling cucumbers
2 tablespoons Kosher salt
1 yellow onion, sliced
(3) 12-oz glass canning jars with sealing lids

Brine Ingredients:

1-1/4 cups granulated sugar
1 cup white vinegar
1/2 cup apple cider vinegar
2 tablespoons mustard seeds
1 teaspoon celery seeds
1/2 teaspoon turmeric
1/2 teaspoon whole black peppercorns
1/2 teaspoon crushed red pepper flakes
1 teaspoon whole cloves
2 cloves garlic, sliced
Dill sprigs

Directions:

1. Wash and sterilize the jars using boiling water.

2. Use a vegetable brush to scrub the cucumbers in hot water, rinsing off any dirt.

3. On a large cutting board, use a chef's knife or a crinkle cut slicer to cut the cucumbers into 1/4" slices. Slice the yellow onion in half, then thinly, pole to pole.

4. In a large mixing bowl, toss the cucumbers with salt and the sliced yellow onion. Place the salted cucumbers and onions in the refrigerator. Refrigerate for 1-1/2 hours.

5. Remove the cucumbers and onion from the refrigerator and place in a colander and thoroughly rinse off the salt with cold water.

6. Evenly distribute the cucumber and onion slices into the prepared jars and set aside.

7. Prepare the brine by combining the white sugar, white vinegar, apple cider vinegar, mustard seeds, celery seeds, turmeric, peppercorns, crushed red pepper, whole cloves, and garlic in a medium saucepan. Over medium heat, bring the brine to a simmer until the sugar completely dissolves.

8. Pour the hot brine over the pickles and onions that were previously placed in the jars. Stir to incorporate. Add the fresh dill to the top of the pickles. Let the mixture stand at room temperature for 1 hour to cool, then add the lids and refrigerate for 24 hours before enjoying! These pickles are good in the refrigerator for up to 2 weeks.

Peach and Tomato Caprese Salad with Pine Nuts, Prosciutto, and Tarragon Oil

Lia Soneson

We love caprese-style salads, and this version with ripe summer peaches, toasted pine nuts, and salty prosciutto takes a classic dish to new heights. Drizzled with tarragon oil and served with crusty bread and a glass of chilled wine, this salad delightfully celebrates some of the best flavors that summer has to offer!


Peach and Tomato Caprese Salad with Pine Nuts, Prosciutto, and Tarragon Oil
Serves 4 - 6

Ingredients:

1/2 cup (or about 3 large) fresh tarragon sprigs
1/2 cup olive oil
4 heirloom tomatoes, quartered and sliced
3 peaches, pitted and sliced into wedges
1/4 red onion, sliced very thin with a mandoline
1/4 cup pine nuts
8 oz burrata cheese, torn into large pieces
2 oz prosciutto, cut into long strips
1/4 teaspoon Kosher salt
1/4 teaspoon freshly cracked black pepper
1/4 teaspoon Aleppo pepper flakes
1/2 tablespoon red wine vinegar
1/2 tablespoon balsamic vinegar
1/2 tablespoon honey
1/2 cup fresh basil
Flake salt

Directions:

1. Make the tarragon oil. Prepare a small ice bath and set aside. Bring a small pot of water to boil. Salt the water and blanch the tarragon leaves in the boiling water for 10 seconds (the leaves should turn a brighter shade of green), remove from heat. Use tongs to transfer the tarragon to an ice bath to stop the cooking process. Remove from the water. Drain through a fine mesh strainer and pat dry with a paper towel. Combine the tarragon and olive oil in blender and puree. Strain through a fine mesh sieve and discard any solids. Set aside.

2. Prepare the veggies. Quarter and slice the tomatoes using a sharp, serrated knife. Pit and slice peaches into wedges. Thinly slice the red onion with a mandoline.

3. In a small skillet over medium heat, toast the pine nuts, stirring often until lightly browned, 2-3 minutes. Set aside.

4. Tear the burrata into large pieces, and arrange the tomatoes, peaches, red onion, burrata, and prosciutto on a large platter. Sprinkle with Kosher salt, black pepper, and Aleppo pepper.

5. Drizzle evenly with the tarragon oil, red wine vinegar, balsamic vinegar, and honey. Sprinkle with the toasted pine nuts, basil, and flake salt.

Mango and Kale Salad

Lia Soneson

Juicy mango, crunchy kale, and tropical coconut make for a knock-out combination in this colorful summer salad. Warm notes of curry mixed with fresh and cooling herbs offer a lovely complexity for a hearty meal any time of day.


Mango and Kale Salad
Serves 6-8

Salad Ingredients:

6 cups kale, ribs removed, chopped into bite-sized pieces
1 tablespoon extra virgin olive oil
1/4 teaspoon Kosher salt
1 cup red cabbage, finely shredded with a mandoline
1 mango, diced
3 green onions, finely chopped
1 red pepper, seeded and diced
15-20 cherry tomatoes, halved
1/3 cup peanuts
1/2 cup unsweetened coconut flakes
1/4 cup fresh basil, chopped
1/4 cup mint, chopped
1/4 cup cilantro, chopped

Dressing Ingredients:

1/3 cup coconut milk, full fat
1 tablespoon apple cider vinegar
1 tablespoon green Thai curry paste
1-1/2 tablespoons fresh lime juice
1/2 teaspoon turmeric
1/4 teaspoon Kosher salt
1/2 tablespoon brown sugar
1 garlic clove, minced

Directions:

1. In a large bowl, combine the kale, olive oil, and salt. Massage the kale for 1-2 minutes to break down the fibers.

2. Use a mandoline to finely shred the red cabbage. Pit and dice the mango. Chop the green onion. Seed and dice the red pepper, and halve the grape tomatoes.

3. Combine the peanuts and coconut flakes in a small saute pan and toast over the stovetop for roughly 3 minutes, tossing often until both the peanuts and coconut flakes are lightly toasted. Remove from heat and set aside.

4. Combine all of the dressing ingredients in a wide-mouthed jar. Whisk or use an immersion blender to incorporate.

5. In a large salad bowl, combine all of the salad ingredients, drizzle with the dressing and toss until coated. Eat immediately!

Grilled Tuna Steaks with Citrus-Ginger Dipping Sauce and Green Beans

Lia Soneson

Tuna steaks are a such an achievable luxury. They come together in just minutes when seared on the grill. Quality tuna steaks will melt in your mouth. Head to your trusted fishmonger, then let the grill do the work! Paired with charred green beans and a savory citrus-ginger sauce, a delicious dinner is served!


Grilled Tuna Steaks with Citrus-Ginger Dipping Sauce and Green Beans
Serves 2

Tuna Ingredients:

(2) 6-oz fresh ahi tuna steaks(sashimi grade)
2 tablespoons olive oil, divided(for brushing tuna steaks andtossing green beans)
1/4 teaspoon salt
1/4 teaspoon black pepper,freshly cracked
12-oz green beans, washed and trimmed

Ginger Dipping Sauce Ingredients:

1/3 cup soy sauce
1 tablespoon sugar
1 teaspoon rice vinegar
1/2 tablespoon lime juice
1/2 tablespoon lemon juice
1/2 teaspoon grated ginger
1 garlic clove, minced

Serve with:

Wasabi paste
Toasted sesame seeds
2 green onions, sliced

Directions:

1. Combine the soy sauce and sugar in a small saucepan and cook until sugar dissolves. Transfer to a heat safe, wide-mouth jar and whisk in the rice vinegar, lime juice, lemon juice, grated ginger, and garlic until combined. Set aside.

2. Brush the tuna steaks with olive oil and sprinkle with salt and pepper.

3. In a large bowl, toss the green beans with the remaining olive oil.

4. In a grill basket, grill the green beans over high heat for8-10 min; occasionally toss with tongs.

5. Grill the tuna steaks over very high heat for 1 minute on each side until grill marks are achieved, keeping the internal meat red.

6. Serve the tuna steaks and green beans with the dipping sauce and a smear of wasabi. Top with toasted sesame seeds and green onion.

Strawberry and Arugula Salad with an Herbed Vinaigrette

Lia Soneson

Celebrate summer with juicy, ripe strawberries! This colorful arugula and strawberry salad features many complementary flavors when tossed with our bright and tangy basil-mint dressing. You’ll find that this salad pairs perfectly with a glass of crisp, white wine and a slowly setting sun.


Strawberry and Arugula Salad with an Herbed Vinaigrette
Serves 4

Salad Ingredients:

4 large eggs, boiled and halved
5 oz arugula, rinsed and dried
10-12 strawberries, washed and hulled
1/2 fennel bulb, thinly sliced with a mandoline
2 celery stalks, thinly sliced with a mandoline
1 avocado, pitted and sliced
4 oz blue cheese, crumbled
1/4 cup almonds, toasted and coarsely chopped

Herbed Vinaigrette Ingredients:

1 tablespoon fresh mint, finely chopped
1 tablespoon fresh basil, chiffonade
1 tablespoon chives, finely chopped
1 clove garlic, minced
1/3 cup olive oil
1 tablespoon Dijon mustard
1 tablespoon fresh lemon juice, plus lemon zest
1 tablespoon white wine vinegar
1/4 teaspoon Kosher salt
1/4 teaspoon black pepper, freshly cracked

Directions:

1. Prepare the Boiled Eggs: Add the eggs to a saucepan and fill the saucepan with water, covering the eggs with about 1-2 inches of water. Bring water to a boil. Once boiling, immediately turn off the heat, cover the pan with a lid, and let sit for 6 minutes for soft eggs, or 10 minutes for hard eggs. Remove immediately from the boiling water and cool by running under cold water for about a minute. Peel and halve the eggs.

2. Prepare the Salad Ingredients: Rinse and dry the arugula. Wash, hull and slice the strawberries. Use a mandoline to thinly slice the fennel and celery. (Use a guard or glove to protect your fingers). Pit and slice the avocado. Crumble the blue cheese.

3. Toast the Almonds:Over medium low heat, toastthe almonds in a small skilletfor 2-3 minutes tossing occasionally until they are fragrant. (Watch closely to avoid burning). Coarsely chop.

4. Prepare the Vinaigrette: Zest and juice the lemon. In a wide-mouth jar, whisk all of the vinaigrette ingredients together until emulsified.

5. Assemble the Salad: In a large bowl, toss the arugula with 1/2 the vinaigrette until coated. Arrange the remaining salad ingredients on the arugula and drizzle with the rest of the vinaigrette. Add additional salt and pepper to taste and enjoy!

Sheet Pan Cherry Pie with Vanilla Ice Cream

Lia Soneson

We love cherry pie. Who doesn’t? This version transforms a traditional round pie into a sheet pan pie, baked in a quarter sheet pan for fuss-free serving to groups of almost any size. The secret addition of nutmeg and black pepper adds surprising warmth and flavor intrigue. Of course, this pie is happily paired with vanilla ice cream, as all fruit pies should be!


Sheet Pan Cherry Pie with Vanilla Ice Cream
Serves 8 - 12

Pâte Brisée Ingredients:
3-3/4 cups all purpose flour, plus extra for dusting
1 tablespoon sugar
2 teaspoons Kosher salt
1-1/2 cups unsalted butter (3 sticks), well-chilled
4 - 8 tablespoons ice water (plus more if needed)
1 egg beaten, for egg wash when attaching the lattice crust and for finishing
Turbinado or raw sugar to finish

Cherry Filling Ingredients:
6 cups pitted sweet cherries (fresh or frozen)
3/4 cup sugar
3 tablespoons cornstarch
1/2 tablespoon lemon juice
2 teaspoons almond extract
1/2 teaspoon nutmeg
1/4 teaspoon black pepper
1/4 teaspoon salt

Directions:


Prepare the Crust:
1. Place the flour, sugar, and salt in the bowl of a food processor. Pulse a few times to evenly distribute.
2. Cut the butter in 1/2" cubes. Use a little of the flour mixture to keep the butter pieces from sticking together. Chill the cut butter cubes for 15 minutes.
3. Prepare the ice water by filling a small bowl with ice cubes and adding water. Stir until the water is well-chilled.
4. Place the butter cubes into the food processor with the flour mixture. Pulse 4-5 times to cut the butter into the flour. The flour-butter mixture will be coarse with some pea-sized pieces of butter remaining. (Resist the urge to keep pulsing.)
5. Add 2 tablespoons of the ice water by sprinkling on top of the flour and butter mixture. Pulse 2-3 times. Continue adding ice water by the tablespoon, pulsing after each addition until a rough dough is formed. Test the dough by pinching together -- if it holds together, enough water has been added. If it crumbles apart, add another tablespoon of water. (Avoid adding too much water, or pulsing too much).
6. Remove the dough from the food processor, and gather it into a rough ball. Flatten the dough ball into two rectangles, one a bit larger than the other. Wrap in plastic wrap and chill for 1 hour, or overnight.
7. Remove the larger piece of dough from the refrigerator and place it on a lightly floured surface. Use a rolling pin to roll it into a 14" x 11" rectangle, then transfer it to a 13" x 9" x 1" rimmed baking sheet (a quarter sheet pan). The pastry dough will hang over the sides of the baking sheet. Return to the refrigerator and chill.

Make the Filling:
8. If using frozen cherries, defrost, drain, and pat dry. In a large bowl, combine the cherries, sugar, cornstarch, lemon juice, almond extract, nutmeg, black pepper, and salt, stirring to ensure ingredients are incorporated.
9. Pour filling into the prepared baking sheet. Preheat the oven to 375°F.
10. Make the lattice top by rolling out the remaining dough into another 14" x 11" rectangle. Cut 1" wide strips. Reform the dough that doesn't work for the strips and roll out and cut again, to get a total of 15 strips. Lay the strips over the top of the filled pie, spacing them evenly apart, ending on the sheet pan edges. One at a time, with the remaining strips, starting in the middle and working outward, weave the strips perpendicularly through the first layer, using an over and under technique. Trim away any excess dough from the lattice strips that extends past the pan. Brush the edge with an egg wash, including underneath the lattice strips. Press the dough together to create a seal. Brush the lattice with more egg wash and sprinkle with coarse sugar.
11. Bake for 40-45 minutes, or until the crust is golden brown and the cherry filling is bubbling. Place on a wire cooling rack and cool until ready to eat. Serve with a scoop of vanilla ice cream.

Pineapple and Coconut Sorbet

Lia Soneson

This pineapple and coconut sorbet is ultra-refreshing! Sweet pineapple mingles with rich coconut flavors in a pleasing, smooth frozen treat. The tropical tastes will have you dreaming about the beach!


Pineapple and Coconut Sorbet
Makes about 1 quart

Ingredients:

4 cups fresh or frozen pineapple chunks
1 tablespoon fresh lime juice
1 can full-fat coconut milk
2/3 cup sugar
1 teaspoon vanilla extract
2 tablespoons shredded coconut, for garnish if desired

Directions:

1. Peel and cut the pineapple into chunks.

Tip: To easily cut up a whole pineapple, use a large chef’s knife and cutting board. First, twist off the leafy top, then trim off both ends. Stand up the pineapple and trim off all of the rind. Cut into quarters, then trim away the tough inner core. Finally, cut the quarters into chunks.

Tip: If you'd like to present the final sorbet in a pineapple half for an extra tropical flare, cut the entire pineapple in half leaving the leafy top intact. Then, use a paring knife to carve out the fruit leaving the rind as a shell. Trim the core off of the removed pineapple and cut into chunks. Wrap the hollowed out half securely in plastic wrap. Refrigerate until ready to serve the sorbet in the scooped out half.

2. Once you've cut up the pineapple, you're ready to prepare the sorbet base. In a blender or food processor, puree the pineapple chunks with the lime juice, coconut milk, sugar, and vanilla until very smooth.

3. Once the sorbet base is pureed well, pour the base through a fine mesh strainer to remove any larger chunks or pieces of rind. Use a wooden spoon to help the puree get through the strainer.

4. Chill the sorbet base for at least 1 hour.

5. Once ready to churn the sorbet, place the sorbet base mixture into the freezing unit. Follow the instructions for your ice cream maker to churn the sorbet.

Tip: If using an ice cream maker with an insert, make sure the insert is completely frozen before attempting to churn. Freeze the insert for at least 24 hours and make sure it is upright in the freezer for even freezing. Chilling the sorbet or ice cream base will also make the churning process more successful.

6. Once the mixture becomes frozen, serve immediately for a soft-serve style. Or, transfer to a lidded container and freeze until serving time.

7. If desired, scoop the sorbet into the hollowed out pineapple half for an extra tropical presentation! Garnish with shredded coconut, if desired.